Archive for 2013


Pros and Cons of Professional Movers

Friday, March 29th, 2013

pros and cons

The stress of moving from one place to another can sometimes be overwhelming.  You may not want to have to deal with all the different aspects of moving on your own.  If you think that you cannot handle the stress of moving by yourself, you should look into getting help with the moving process.  But before you do that, it may be helpful to weigh the pros and cons of professional movers.

The Pros

1. Not all of the weight (literally and figuratively) is on you: Professional movers are there to help you. They will do most of the physical moving, saving you from lifting heavy furniture on your own, or making 37 separate trips up and down 3 flights of stairs.

2. It will take less time: Since none of your friends came through for you, you will have a hired team of people to help you move. That means that a move that would take you an entire day (or more) on your own could only take 2 or 3 with professional movers.

3. They have the know-how: Not sure how you can fit a couch, recliner, desk, dresser, bookshelf, and a mattress into a medium-sized moving van – before all of your boxes go in? Professional movers will. They will pack a van or truck in the most efficient possible way, so that you can move as many items as possible in as few trips as possible. They will also know how to properly lift and carry bulky, heavy furniture.

The Cons

1. Potential limits: A professional moving service may have restrictions on how far they will travel, how much they can carry, or even what they can carry. If you are moving an entire 4-bedroom house’s worth of stuff 250 miles away, a local moving service may not be able to help you. There may also be weight limits on their vans, as well as items that they are prohibited from carrying, such as alcohol or pets.

2. Pre-determined packages: Many moving services have set packages and pricing, so you could end up with a rented van or truck that is either too big or too small. This will need to be considered when you hire a professional mover.

3. Cost: When you hire professional movers, you will need to consider the following cost-benefit factors: how long you need them, how much equipment you need, how they charge you (per hour, day, or rental van?), and how far you are moving.

So, Are Professional Movers Worth It?

That depends completely on your situation, and the pros and cons of professional movers. Professional movers can be very helpful, but hiring them just may be too expensive and not worth the cost. If you want to know more about your options when hiring professional movers, just use TalkLocal. We will connect you with up to three, reputable moving services in your area. You will be able to speak with and compare various, local professional in a matter of minutes.

Different Types of Dentures

Thursday, March 28th, 2013

Different Types Dentures - Dentists

No one really wants to need dentures, but sometimes diet, poor dental hygiene, and heredity can lead to adult tooth loss.  Missing teeth can cause a variety of problems, including impaired speech, loss of self-esteem, difficulty eating, and infected gums.  Whatever the reason for tooth loss, dentures can help alleviate some of the associated problems.

Although comfort and appearance are important factors when choosing dentures, function should be the number one concern.  There are four main types of dentures to consider based on function.

Different Types Dentures:

Standard Dentures: These are useful to replace teeth that have completely fallen out. A dentist will fit the patient for dentures by making an impression of the upper and lower gums. Necessary adjustments – such as fitting – will be made during follow up appointments.

CuSil Dentures: These removable dentures cover partial areas of the mouth and are held in place by existing teeth. Deliberate holes are placed throughout the dentures to allow teeth to push through. CuSil dentures work best as upper dentures.

Immediate, or Temporary Dentures: Sometimes called flippers, these are another type of removable, partial dentures. Often becoming permanent dentures for some people, the dentures are made and fitted before any natural teeth have been extracted. Then, once the teeth are removed the partial dentures are placed over the healing gums. Wire may be used for additional support.

Implant Retained Dentures: These are the most durable and permanent type of dentures, and are often the most expensive. Implant retained dentures are a smart option for people who have trouble wearing lower dentures. They are implanted by placing a titanium screw into the pre-drilled gum where over the course of several months it will bond to the underlying bone. Then, a post is attached to the implant to which a porcelain tooth may be attached.

When you’re in need of any dental professional, you can use TalkLocal to be connected with reputable professionals in you area We’ll connect you with up to three professionals in just minutes, so you can find the help you need, when you need it.

When To Get A Watsu Massage

Thursday, March 28th, 2013

When To Get A Watsu Massage - Massage Therapy

If you are checking into massage therapists and find one near you that offers “watsu”, you may be wondering when to get a watsu massage. In order to determine that, you first need to know what it is and the conditions it can help.

What Is Watsu?

Watsu is a form of water massage therapy designed by a massage therapist named Harold Dull when he began teaching his Shiatsu students in a warm pool. The deeper relaxation achieved in the warm pool made him decide to pursue this form of therapy further.

The name comes from the combination of “water” and “Shiatsu”. The therapy must be performed in a heated pool with the water being heated to the exact temperature of the body.

Both the massage therapist and the person being treated are in bathing suits. The “table” for this massage is the therapist’s arms — he or she will cradle the client under his or her knees and behind the back. The person receiving treatment will hold one arm behind the therapist’s back and one will remain free floating. The therapist will then be able to stretch and gently twist the client’s body in order to relieve the effects of stress, disability, surgery and more.

How Can It Help?

While this type of therapy certainly helps those with common ailments like chronic pain and stress, it can also alleviate symptoms of the following conditions:

– Cerebral palsy

– Fibromyalgia

– Stroke

– Spinal cord injury

– Post mastectomy

– Parkinson’s Disease

– Traumatic brain injury

– Arthritis

– Post-traumatic stress disorder

 Is Watsu Massage Available In Your Area? Find Out!

In order to determine when to get a watsu massage, you must determine if you have a condition that might be relieved by such a treatment — that is, if it is even available in your local area. To find out, TalkLocal can get you in touch with a massage therapist near you who can answer all of your questions. The best part is our service is completely free!

How to Fix a Computer From Another Computer

Thursday, March 28th, 2013

How to Fix a Computer From Another Computer - Computer Repair

Fixing a computer by using a different computer seems like it would not work at all, right?  But in reality, this is a useful way to connect with and resolve issues on your computer when you are not near it, or if a broken computer screen is preventing you from addressing such issues. We’re here to show you how to fix a computer from another computer.

How to Fix a Computer from Another Computer

One solution you have to fix one computer from another would be to skype or videochat between the computers and guide the person on the other end through the correct steps. If both participants are tech-savvy and the computers are compatible you will have a quick easy fix to your problem.

If video-chatting is not an option you can also try to screencast with a program called CamStudio.  This innovative software will allow you to create a tutorial video of the steps that the other computer needs to take to fix the problem.  You can send the video to the other computer wirelessly.

A third option you have is to install a remote desktop control program. The best and most widely recognized program is CrossLoop. This software allows you to control the other computer with your own monitor, keyboard and mouse if both computers are connected to the internet simultaneously.  This option comes in handy when dealing with a very complex problem.  You can download the free version of CrossLoop onto both computers, set it up and create accounts. You should then share the two accounts to allow the two computers to connect.  From there one computer can take over the other and fix the problem it is having.

Have a Professional Take a Look

If you cannot seem to get the computers to connect or you are having issues fixing the problem, it may be time to call in professional help.  Use TalkLocal to find reputable computer professionals in your area. Just tell us what you need, where you are, and when you are available, and we’ll connect you with up to three professionals in your area, in just minutes.

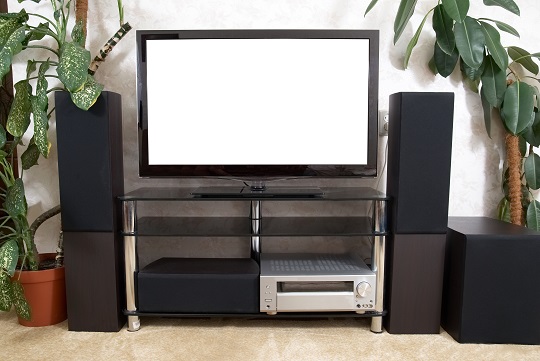
How to Install Surround Sound System to TV

Thursday, March 28th, 2013

How to Install Surround Sound System to TV - TV Repair

Want movie-quality sound in your own living room? The a surround sound system is for you. Surround sound speakers can engross you in a film, just like movie theater speakers do.  Installation of surround sound is actually quite easy. Here is a list of how to install surround sound system to TV.

How to Install Surround Sound System to TV

1. Remove the speakers from their packaging and identify the types of speakers. A usual surround speaker system has a sub-woofer, a center speaker, two front speakers, and two rear speakers. It will also come with a receiver, which is the hub that connects all of the speakers to the television.

2. Unplug any wiring on your TV to prevent any accidental electrical shocks. This includes the television, DVD or Blu-Ray players, cable or satellite boxes, or game consoles.

3. Remove the protective caps from the wiring on the surround sound speakers.

4. Connect the colored wires to their matching terminal on the back of the receiver.

5. Attach the other end of wire to the corresponding terminal on the speaker.

6. Connect the receiver to TV.

7. Place the center speaker either above or below the TV. Placement of this speaker mostly depends on your TV cabinet, but the receiver must be close enough to the TV that it can be connected.

8. Place the sub-woofer on the ground. If you only have one sub-woofer, center it with the television and main seating area. For two sub-woofers, angle them from the sides of the TV towards the center of the seating area. Don’t place the sub-woofer in the corner, as this will muddy up the sound. You want the sound to be as evenly distributed to as many seats in your living room as possible. Don’t connect subwoofer to A/V receiver with speaker cables.

9. Have the front and rear speakers at ear level, based on the seating area. Each front speaker can be placed on either side of the center speaker, positioned towards the audience. Each rear speaker can be placed on either side of the seating area, or slightly behind, angled towards the center of the TV.

10. Adjust your surround speaker system to find optimal sound. You want general sounds like speaking to be evenly distributed throughout the room. Deeper, louder sounds from the sub-woofer should be felt and heard, without drowning out softer sounds. Gradually turn up the sub-woofer’s volume to find its balance with the mid-range and treble.

11. Hide and secure wires along the floor or walls to avoid tripping on them.

12. Don’t assume that surround sound will be “surrounding” all the time. Watch some action movies to hear the surround sound at its best.

Bring In the Professionals

If you feel that installing a surround sound system is too much work, you can always hire a professional to install the speakers for you. For professional installation use TalkLocal. Just tell us what you need, where you are, and when you’re available, and we will connect you with the right professionals in your area.

How to Tell If Your Hamster Is Sick

Thursday, March 28th, 2013

How to Tell If Your Hamster Is Sick - Veterinarians

Hamsters are small yet resilient animals. They are usually energetic creatures, but inefficient care, improper diet, poor environment, or even bad genes can slow them down and cause illness. To ensure a long (in hamster-years), healthy life for your hamster, it is important to know how to tell if your hamster is sick. Below are some symptoms that you may notice if your hamster is ill.

Some Symptoms Include:

– Unusual inactivity

– Loss of appetite: take note of your hamster’s regular activity when it is healthy. This typically means eating well, normal grooming, and active play.

– A dirty or matted coat

– Dull eyes: take note of your hamster’s appearance when it is healthy. A healthy hamster should have bright eyes and a shiny coat.

– Red or flaky skin

– Excessive itchiness

– Lumps beneath the skin

– Sneezing, or runny eyes or nose

– Dull eyes: a healthy hamster should also have bright eyes.

– Wheezing

– Shaking or shivering

– Wetness in the tail area

– Diarrhea

If you notice strange behavior or any of the symptoms listed above, you should consult a veterinarian as soon as possible. A professional can provide your hamster with a proper diagnosis and treatment.

Get Your Hamster Well Again!

If you need to find a veterinarian in your area, look no further than TalkLocal! Just type in what, where, and when you need veterinarian help, and we will connect you to the right professional in just minutes. It’s totally fast, and free!

Are There Items Movers Can’t Transport?

Wednesday, March 27th, 2013

Are There Items Movers Can't Transport? - Moving and Storage

Moving is a stressful time for anybody.  Having to pick up and leave the place you are living requires a lot of work.  Hiring professional movers can be a huge relief for you, but you may be asking, “are there items movers can’t transport?” It is important for you to be aware of any prohibited items that your moving company will not transport.

Items Movers Can’t Transport

– Plants

– Valuables

– Pets

– Hazardous materials

– Combustible materials

– Food/perishables

– Irreplaceable items

Hazardous and combustible items include the following: Ammonia, cleaning supplies, darkroom chemicals, fire extinguishers, fireworks, batteries, matches, fuels, oil, fertilizer, poison, charcoal, lighters, bleach, paint, propane, ammunition, aerosol, pesticides, nail polish, weed killer, pool chemicals, gasoline, chemistry sets, kerosene, paint thinner, etc.

Why Are These Items Prohibited?

Moving companies claim no responsibility for the items that they are moving for you. This is the reason they will not move valuables or items deemed irreplaceable. Moving companies also will not recognize the death of a plant or a pet, the theft or loss of valuables or if your food goes bad.  You should look into getting moving insurance just to protect yourself when working with professional movers.

Find the Right Movers

If you have more questions about what you can and cannot move you could talk to a professional moving company in your area.  The easiest, fastest way to get in contact with reliable, local moving companies is to use TalkLocal. Within minutes, we will connect you with up to three moving companies in your area, so you can choose the right one for you!

Windows 7 Installation Problems

Wednesday, March 27th, 2013

Windows 7 Installation Problem - Computer Repair

Windows 7 is generally regarded as a good upgrade from Windows Vista, saving system memory and boosting efficiency. However, installation of any new OS can come with a multitude of problems. Here are some possible causes and tips for resolving Windows 7 installation problems.

Bad DVD

If you burned the ISO to DVD yourself, there is a chance that the DVD did not burn correctly, and you should try burning it again at the slowest speed. The ISO itself might be corrupt, so if possible, try to obtain a new copy of the ISO.

Hanging Installer

A common problem is that the installation hangs at a certain point, often 62%. This is because the Iphlpsvc service has stopped responding, and you will have to make the computer ignore that service during installation in order for the Windows 7 Installer to proceed.

1.      Restart the computer. Your computer will roll back to Windows Vista.

2.      Click Start, right-click Computer, and then click Properties.

3.      On the Advanced tab, click Environment Variables.

4.      Under System variables, click New.

5.      Type MIG_UPGRADE_IGNORE_PLUGINS in the Variable name field.

6.      Type IphlpsvcMigPlugin.dll in the Variable value field.

7.      Click OK three times to close the dialog boxes.

8.      Start the upgrade installation again.

Another reason why the installer might hang is because you have a USB plugged in. Printers, webcams, and USB hubs may cause the installer to freeze. Unplug all USBs and switch your mouse to one without accompanying software, then try installing again.

Some have found it helpful to press Ctrl+Alt+Del when the installer hangs, as sometimes the installer would then proceed as usual.

Unable to Locate Partition

Make sure the primary partition of the hard drive is active and formatted in NTFS. If it isn’t, download the free partition program Diskpart and type in and open “command prompt” from the start menu, then right click on the Diskpart program and select Run as Administrator. Follow these instructions in the command prompt:

1.       Type diskpart and press enter.

​2.       Enter list disk and note the number of the disk you want to install on.

3.       Select the appropriate disk.

4.       Enter list partition and note the number of the partitions you want to install on.

5.       Select the appropriate partition.

6.       Enter active.

Other Issues?

Locating the error while installing a new OS can be a tricky process, but luckily TalkLocal is here to help. We will find up to three, highly-qualified computer technicians near you, on your schedule, and for free — in just minutes!

How to Install Dimmer Switch

Wednesday, March 27th, 2013

How to Install Dimmer Switch - Electricians

Lighting is one of the most important aspects of your home.  It dictates what you can do and how you feel.  With regular light switches, you can’t really use rooms for multiple purposes. However, if you install dimmers, you can! You can transform bright, cheery, well-lit rooms into subtle, romantic, cozy corners with the help of dimmer switches.

How to Install Dimmer Switch

1. Turn off the power in your home.  If you can, also turn the electricity off for the room in which you are working, using the fuse box. Double-check that the power has completely stopped flowing by using a voltmeter on the outlet or switch. Once the electricity is off you can start to work on the switch.

2. Use a screwdriver to remove all of the screws holding the switch plate to the wall.  Keep these screws in a safe place as you will need them later on.

3. Disconnect the wiring from the box.  Remember to unscrew the grounding wire before removing the box from the wall.

4. After the box is taken out you will see three wires: one black, one white, and a separate ground wire that is usually copper or green.  These wires connect to the dimmer plate in the same way that they did to the old switch plate.  Connect them to the dimmer plate and use pliers to secure them.

5. Carefully place the box and wires back into the wall and screw in the new dimmer switch. Once the switch is back in place you can turn the electricity back on and start using your new dimmer!

Need Help Lighting Up Your Home?

If you have more questions about how to install a dimmer switch you could talk to a professional electrician.  The easiest, fastest way to get in contact with reliable local electrical companies is to use TalkLocal. Just tell us what issue you’re having, your location, and availability, and we’ll connect you with up to three electricians in your area who can help you out.

Difference Between Dental Caps and Crowns

Wednesday, March 27th, 2013

Difference Between Dental Caps and Crowns - Dentists

What is the difference between dental caps and crowns? Actually, there is no difference. Formally known as dental crowns, these dental restorations are used to cover, or “cap”, the tooth to restore the original size, shape, and strength of the tooth that it is replacing. Crowns are typically used to repair teeth that are broken down or cracked. They are used when the damage is too great to repair with a large filling or a dental bridge.

What Exactly Are Dental Crowns?

Dental crowns can be made from materials such as ceramic, porcelain, stainless steel, and even gold. Porcelain and ceramic crowns match the natural tooth color and are often better choices aesthetically. Porcelain crowns, however, are often fused to metal, which can show near the gum line over time. Ceramic crowns are not fused to metal and are best used in areas with limited space. The elimination of metal also allows for light to transmit through the crown, which creates a more natural appearance.

Colloquially, people tend to refer to dental crowns made from ceramic or porcelain as “caps,” and those made from gold or stainless steel as “crowns.” Crowns made from metal do not have the most aesthetic appeal, but they are desirable in some instances. They tend to have better durability and are favorable for teeth located in the back of the mouth, such as molars. Gold and steel crowns tend to last longer and require less preparation than ceramic or porcelain crowns. They also tend to be less abrasive when chewing, which helps prevent the wearing of teeth.

Do You Need Dental Crowns?

Do you think you may need dental crowns? Be sure to talk to a dental professional to help you consider your options. TalkLocal will connect you with up to three dentists in your area in just minutes.