Archive for 2013


Install An Internal Hard Drive

Saturday, May 18th, 2013

Install Internal Hard Drive - Computer Repair

If you are looking to install an internal hard drive, you have likely encountered one of two problems:

          – Your existing hard drive is fried and will no longer work.

          – You want to reinforce your computer — maybe it’s a custom built computer — with additional hard drive space.

Either way, learning to install an internal hard drive is a must, and is certainly not as hard as you might think it would be. Follow these general steps and you can successfully pull of this technological feat on your own.

1. Turn off your computer and disconnect the power cord completely. Expose the internal workings of the computer and always make sure to identify the components before you start unplugging or moving things around.

2. If you are replacing the hard drive, locate it first. This might be the toughest part of the whole process — which isn’t really tough at all. Once you locate the hard drive, slide it out of its cage or wherever it is mounted and unhook all of the cables leading in to it.

3. If the old drive needed rails or any other sort of mounting tools, make sure to transfer those over to the new hard drive. This will let the new hard drive seamlessly slip into the space where the old drive was housed.

4. Connect the information and power wires to the new hard drive and slide it into place.

5. If you are adding an additional hard drive, find a vacant spot to house the drive. Once you do, locate one of the loose data cables inside the computer, which are attached to the motherboard. Connect the data cable to the new hard drive before fixing it in place. You will also need to locate a free power cable and plug it into the new hard drive as well.

6. Finally, format that hard drive. With an operating system like Windows, this can be done via a simple, automated process.

Need Help?

Not everyone is confident tooling around inside their computer to install an internal hard drive. If you are one of them, try using TalkLocal to find someone that can help. We connect you with local technicians that are eager to help. The best part of all is that you won’t have to waste hours searching through the phonebook to find someone. Let us do the work for you!

Different Wall Anchors

Saturday, May 18th, 2013

Different Wall Anchors - Handyman

If you are trying to hang a painting, shadow box, shelf, or a creative art piece that seemed like a good idea when you bought it, you might be considering different wall anchors. Attempting to hang something too heavy for the wall can be both frustrating and damaging.

As a rule of thumb, you will likely be looking to hang your piece on drywall, so below are three basic types of different wall anchors and their purposes.

Plastic Ribbed

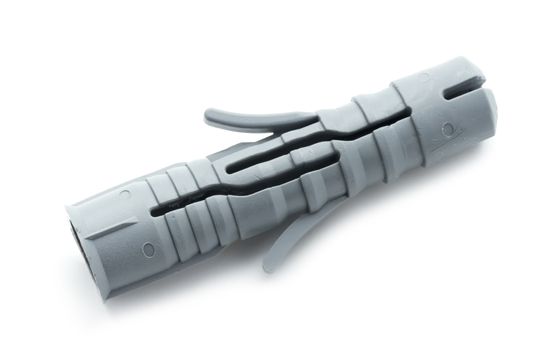
These are the most common type of anchors used. They are best for lightweight objects like pictures and small wall décor. You will first drill a pilot hole in the spot you wish to insert your screw. The plastic sleeve of the anchor then twists into the predrilled hole and you may then screw your screw into the sleeve.

Self-Threading

These anchors are made for medium-duty hanging such as larger pictures in frames, larger wall décor and so on. The basic design of these anchors is that the anchor itself is pretty much just a nut with a point on the end. These anchors require no drill or screwdriver, and can be twisted into the spot where you wish to hang. You then screw the screw into the anchor to hang your piece.

Toggle Bolt

These facilitate the heaviest weight among the different wall anchors, holding up to 40 pounds if installed correctly. Their strength comes from wings that grip inside the wall and give more stability.

Remember, any wall anchor will be strongest when installed directly into a stud. Studs are the pieces of wood that make up the frame for your wall. They are generally around 12 inches apart. Studs can be found through the tried and true knocking method, or you could simply invest in an electronic stud finder.

At A Loss?

Try contacting a professional. A qualified handyman will know which anchor you need and where to hang your piece. TalkLocal can find a qualified handyman in your area quickly and easily. The best part is that our service is entirely free.

How To Calculate Alimony Payments

Friday, May 17th, 2013

How To Calculate Alimony Payments - Lawyers - Family

Alimony is spousal support. It is the financial support payment from one ex-spouse to the other. Alimony payments are up to the discretion of the court. The payment will have certain conditions attached, such as duration and amount.  The court will consider the need of the spouse with the lesser income versus the amount to pay from the spouse with the larger income. However, it is possible for a couple to come to an agreement on their own terms without the ruling of the court. In any case, you should prepare yourself by learning how to calculate alimony payments.

Factors Included in Alimony Payment

The judge will consider a few factors when determining the alimony payment. These factors include:

1. Duration of the marriage: Calculate how long the marriage lasted. The longer you were married, the higher the alimony payment. Also, the alimony is more likely to be required if the marriage lasted for more than 10 years.

2. Income of each spouse: If there is a big difference between each spouse’s income, the judge will likely order alimony to be paid. If your marriage lasted 10 years or longer, this increases the likelihood of paying alimony.

3. Age of each spouse: The younger you and your spouse are, the lower the alimony payment, because younger adults have more time to make money and support themselves.

4. Standard of living during the marriage: The court will try to keep you and your ex-spouse at the same standard of living as when you were married.

5. Each spouse’s available assets once the divorce is finalized: The value of assets after the dissolution of marriage will help determine if you and your ex-spouse can support yourselves without the extra financial support of alimony.

6. Why the marriage ended: The court will oftentimes deny alimony payments to an unfaithful spouse.

7. Children: The court could order temporary alimony payments to a spouse that primarily cares for any children from the marriage.

Consult A Lawyer

Research divorce cases similar to yours in order to help you assess your situation. If you are looking for a lawyer to handle your divorce, TalkLocal can help connect you with the best lawyers in your area. We will connect you with up to three lawyers in just minutes – for free!

How To Build A Gaming Computer

Friday, May 17th, 2013

How To Build A Gaming Computer - Computer Repair

Custom-building a computer can be quite rewarding, but building a computer on which you can play your favorite games is doubly rewarding! You get to customize all of the specs you want, so that your computer performs at the highest possible level. And you get to really test the limits of a machine that you built. Here is some advice on how to build a gaming computer.

Factors To Consider

When building your own gaming computer, the main factor you need to consider is frame rates.  Building a gaming computer involves a lot of parts but it does not have to cost a lot.  You can construct yourself a great system that runs video and computer games with phenomenal clarity.

The biggest trade-off you face when you build a gaming computer is between graphics and performance.  You can deal with this problem by choosing whichever you need for the games you play.  If you play fast-paced games, you should choose performance.  If you need quality visuals, choose graphics.

Below is a list of the parts you can use to build a gaming computer that is balanced between both performance and graphics:

CPU: Intel Core i5 2500K

Graphics Card: XFX Radeon HD 6870

Motherboard: Gigabyte GA-Z68MA-D2H 8GB

Memory kit

HDD Storage: Samsung SH-B123L BD-ROM

Optical Drive combo

Case: Coolermaster HAF 912

PSU: corsair builder series CX600 600W

Operating System: Windows 7 Home premium

Power Supply

Assemble these parts in the same way you would put together a regular computer.  Use as much space as you need and do not clutter the device.  You should remember that the mounting posts on the motherboard need to be installed in the microATX mount posts instead of in the full size holes.

Seek Professional Advice

If you cannot figure out how to build a gaming computer you should try to talk to a professional so that you can get the best help possible.  The easiest, fastest way to get in contact with reliable local IT service technicians is to use TalkLocal. Just tell us what issue you’re having, your location, and availability, and let us do all the work.  Within minutes you will be connected to up to three professionals, for free!

How To Throw Away Yard Waste

Friday, May 17th, 2013

How To Throw Away Yard Waste - Garbage Removal

It is important that you properly dispose of yard waste or else you risk the waste from your yard clogging storm drains or filling up bodies of water in your area. This article will teach you how to throw away yard waste in the most environmentally-friendly ways possible.

Grasscycling

By recycling yard waste, or “grasscycling,” you will limit the build-up of thatch on your lawn and make it much easier to care for you lawn. Additionally, it will make the tedious job of mowing your lawn much quicker (it can make the process up to 50% faster). You will also not need to fertilize and water you lawn as often. All in all, grasscycling will make it quicker and easier to take proper care of your lawn.

How To Grasscycle

To grasscycle, you simply have to leave the clippings of your lawn after you mow. The grass clippings will soon decompose and add nutrients to the soil of your lawn. If you plan to grasscycle, you should mow your lawn when the grass has not been watered in a while. You want there to be no moisture in or on the grass. Additionally, you want to mow your lawn with a mower with sharp blades.

For the best results of grasscycling, you want only small grass clippings left on your lawn. Make sure to mow your lawn often, so that you are never mowing more than one third the length of your grass.

Composting

You can also place your grass clippings in a bin with other green waste, such as weeds and trimming. Adding a bit of water to the bin will allow nature to decompose the waste even quicker. Compost will usually attract insects and microorganisms that can be helpful to your lawn. You can place compost on top of you lawn or mix it with your soil to benefit your lawn.

Find A Place To Dispose Of Yard Waste

If you have excess yard waste, you may want to contact a garbage removal professional to help you. With the help of TalkLocal, you can be on the phone in minutes with up to three, high-quality garbage removal professionals in your area that are available when you are.

Determine Resale Value

Friday, May 17th, 2013

Determine Resale Value - Real Estate

If you are looking to buy a home, you may be interested in how to determine resale value for the future. In other words, is the house currently listed at a fair price, and will you be able to sell it at, or above, what you paid for it?

Quite a few factors go into determining the resale value of a home. At the end of the day, a home is only worth what someone is willing to pay for it, which can lead to variability in price. Here are some guidelines to keep in mind:

Bedrooms

Perhaps you are a single person who only needs a bedroom and an office, but the majority of home buyers are looking for at least three bedrooms. This leaves room for the master bedroom, and office/guest bedroom and another bedroom in the instance that a couple wants children.

Location

This is pivotal. Busy streets, perceived “bad” neighborhoods, or being near foul-smelling facilities (landfills, factories, water treatment plants, etc.) can drive down the resale value of a home.

Updates

These can range from low-cost (replacing doors, trim, paint, and countertops) to high-cost (expansion of rooms, additions, or complete remodels) renovations. Many buyers want a home to be move-in-ready, so any update helps.

Comparable Homes

What are homes selling for in the area with similar condition and layout? Check to see if the value of homes have increased or decreased over the years.

Investing in real estate can be tricky. If working alone, you run the risk of being blindsided by issues you are inexperienced with, such as radon, termites, inspections, flood plains, and more. If a house seems to be well below what it is worth, there is a reason. It could be because of foreclosure, or it could be something much worse.

Find Real Estate Professionals That Can Help

In any case, call a professional. TalkLocal can find a real estate agent in your area that can determine resale value of a home. Our service is absolutely free. Real estate is too much of an investment not to protect yourself.

How To Finish Wooden Trim

Friday, May 17th, 2013

How To Finish Wooden Trim - Painters

Replacing old trim in a home can really give it a fresh appearance. If you have checked with your local home improvement store, buying new, finished trim can be pricey. An inexpensive way to freshen the look of your home is to buy unfinished trim. This will be less costly, but you will need to know how to finish wooden trim in order to achieve the look you’re hoping for. The process is very similar to the way in which you finish wood paneling.

How To Finish Wooden Trim

1. Choose a well-ventilated area that is free of dust and debris. The garage tends to work best because you can open the door without worrying about leaves or dirt blowing into your project.

2. Sand down your trim. Most pre-cut pieces of trim will be smooth enough, but you will still need to sand the wood. This process will allow for the stain and finish to stick to the wood more easily.

3. Find a stain that works with the wood you choose. Generally, stains work best with the wood they were designed for.

4. After blowing off all of the saw dust left from sanding, use an old rag or sponge tip brush to apply the stain evenly. Try to avoid bubbles. If you notice bubbling, dab the rag or brush on the area to even it out.

5. Allow the pieces to dry overnight.

6. Apply a clear seal coating to the trim. This substance can be found near the stain in your local home improvement store.

7. Allow the seal coating to dry overnight.

Not Confident In Your Skill?

The process is relatively simple and can save you quite a bit of money. If you are looking to save more, consider saving the old trim and refinishing it. If this project seems like more than you can handle, call an expert. TalkLocal can find you a professional in your area that will know how to finish wooden trim. Our service is fast, easy, and free.

Installing New Windshield Wipers

Thursday, May 16th, 2013

Installing New Windshield Wipers - Auto Repair

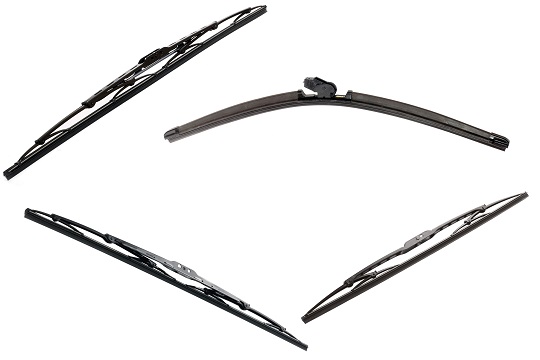
Windshield wipers are an important part of your car. They wipe away any debris or water that may be affecting your line of vision while driving. Sometimes the wiper blades will dull down or entirely fail, so you may have to replace them. Installing new windshield wipers may seem difficult, but it is relatively easy to do it yourself.

You should not wait until the last minute to replace your windshield wipers.  Many people wait until it is actually raining to remember that they need new wipers, but this is the worst time to take on the task.  You may not have time, and then attempt to drive around with the old, malfunctioning wipers.  This is very dangerous and could potentially cause an accident for you or someone else who uses your car. Installing new windshield wipers is an easy task that will allow you to drive more safely.

Taking Off The Old Wipers

1. The first thing you need to do when installing new windshield wipers is to take the old ones off.  Because your windshield wipers are made of metal, you need to be extremely cautious when taking them off.  They could scratch the windshield glass if you are not careful.

2. Pull the entire piece away by propping it up first.

3. Press the small tab at the bottom of the arm where it meets the windshield.  You should be able to easily pull the wiper off.

Installing New Windshield Wipers

The empty wiper arm now has an open attachment point.

1. Look at the side of the wiper where it should be attachable to the metal arm.

2. Rotate the flat plastic clip so it points to the blade.

3. Flip the wiper upside down next to the metal arm and find the curved arm that should match the curved plastic clip.  Once everything is lined up you can click the wiper into place.

4. Pull tightly so that you are sure the windshield wiper is completely secured.  You can lower the wiper back down and repeat this process for the other wiper.  Ensure that the wipers operate properly, and you should be good to go!

Continuing Problems

If you have more questions about replacing your car’s windshield wipers, you should try to talk to a professional.  The easiest, fastest way to get in contact with reliable local car service businesses is to use TalkLocal. Just tell us your issue, location, and availability.  Within minutes we will connect you to up to three professionals for free!

Coffee Maker Filters

Thursday, May 16th, 2013

Coffee Maker Filters - Appliances Repair

If you are a coffee addict, and you brew your favorite cup in a traditional coffee maker, you already know how important coffee maker filters are. The filter keeps the coffee grinds from ending up in the pot and subsequently your mug of coffee. Straining out the grinds prevents the coffee from over-brewing, which makes your coffee taste burnt.

There are a variety of coffee maker filters on the market, each of them effective in their own way. Here are some of your options:

Paper Filters

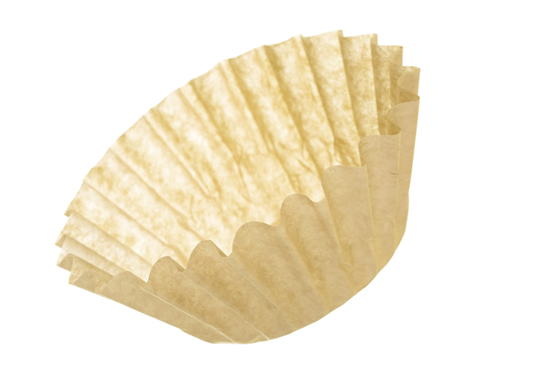
These are the most common, and for good reason. They are incredibly effective at removing all residue from the coffee grounds and beans. Many people opt for paper filters because they are convenient — you just grab a new one every time you want to brew coffee, and throw it away when you are done. You do not have to spend time cleaning your filter.

Still, the cost can add up over time. With permanent filters, you’re making a one-time purchase that will cover your filtering needs for years.

Cloth Filters

Cloth coffee maker filters are very similar to paper, only, they last longer and have wider pours. They are made of cotton, hemp and similar cloths. This allows for small remnants of coffee grounds to get through into the final product. While some might argue that this contributes to an over-brewed cup of coffee, others respond by saying it helps the coffee to taste stronger. Once you’re done with it, you will have to clean it. These filters can get discolored in a hurry.

Metal Filters

Metal filters are the most durable and long lasting. Some of the highest quality filters are even made out of gold. Not only can these be used for years, but they also allow the most coffee through. While this can make for bold-flavored coffee, it can leave behind sediments in your cup of coffee.

If Your Coffee Maker Breaks…

How do you like your coffee? The answer to that question will lead you to the coffee maker filters for you. If you have questions on how to install filters, or if your coffee maker is acting up, you can contact an appliance repair professional via TalkLocal. The process is fast, easy, and free!

DirectX 11 Not Installing In Windows 7

Thursday, May 16th, 2013

DirectX 11 Not Installing In Windows 7 - Computer Repair

If you are a computer gamer, you were probably stoked to find that Windows 7 offered a new version of DirectX — the software that makes for crystal-clear picture and ear-popping sound for most PC games. DirectX 11 promised to better harness the power of multi-core processors and provide for a more enjoyable gaming experience.

You won’t be able to experience any of this if you find DirectX 11 not installing in Windows 7. The following is some insight if you find you are unable to use DirectX 11.

Graphics Card Doesn’t Support DirectX 11

If you suspect that DirectX 11 not installing in Windows 7, it might just be a case that your current graphics card does not support it. You will have to do a little research to confirm that this is the case. However, if your graphics card does not support DirectX 11, you can always revert back to an older version of DirectX, which should be available on your computer.

Of course, the more expensive alternative is to upgrade your graphics card (i.e. Nvidia 400 series and above or other cards that support DirectX 11).

Do I Have To Manually Install DirectX 11?

DirectX 11 comes standards on Windows 7, so you will not have to manually download this software. To ensure your computer is equipped with DirectX 11, you can run your Windows updates. However, DirectX 11 will only run if you have the proper hardware (current video card) to support it.

Your system will automatically have the DirectX files that you need, based on your computer’s hardware.

Get The Most Updated Version of DirectX 11

While you will not have to manually install DirectX 11 on your computer, you can seek out the most updated version. These latest versions will be available on the Microsoft website and can be downloaded via an easy step-by-step process.

Confused Yet?

If you are only a casual gamer, your head might be spinning right about now. A computer repair technician would be able to supply you with the knowledge you need to keep your machine up to date. Find one through TalkLocal and cut through the hassle of shopping around in the phonebook.