Archive for the ‘Computer Repair’ Category


Computer Screen Colors Distorted

Friday, August 17th, 2012

Computer Screen Colors Distorted

If you notice particular discoloration in the monitor, then your monitor color has distorted. Don’t worry, if a monitor has color distortion, it is usually nothing major and can be improved by few quick fixes.

First, check if there is a problem with the physical monitor. Plug another monitor into the computer. If there is no color distortion from the new monitor, then the other monitor needs to be replaced. If not, read the following methods for fixing color distortion.

Adjust monitor cables to be tight and secure. Loosely connected monitor cables can create color distortion.

Adjust brightness/contrast on the monitor. For desktops, the contrast and brightness buttons is on the lip of the monitor. For laptops, the contrast and brightness control is usually the up and down arrows or a combination of keys.

Adjust color.

For Windows 7:

1. Click Start > Control panel.

2. In the search box, type “calibrate display.”

3. Click “calibrate display color.”

For a Windows XP:

1. Click Start > Control Panel > Display > Appearance.

2. Change the computer to default.

3. Click “Windows XP style” from the drop down menu.

Degauss the monitor. Magnetic fields around the monitor can cause distortion around the edges of the screen. There are various ways to degauss the monitor: You can restart the computer, which will automatically degauss upon being turned on (the computer will make a twang sound). If that does not work, degauss manually. Some computers have a degauss button (it has a picture that looks like a horseshoe). Others will degauss by pressing the brightness and contrast buttons together or going to the monitor options menu. If you are good with tools, you can try degaussing with a plug pack transformer, soldering gun, and rigged drill.

If the monitor still has color distortion after you try these solutions, then call a computer professional to assess the situation. TalkLocal connects you with best computer professional in your area for free.

Shockwave Flash Crash Google Chrome Solution

Friday, August 17th, 2012

Shockwave Flash Crash Google Chrome Solution Computer Repair

Do you find yourself frequently receiving a message that says “The following plug-in has crashed: Shockwave Flash” when visiting a certain website or trying to watch a video online? It can be very inconvenient and quite annoying. It turns out that this message is more likely to happen in Google Chrome than any other browser, including Firefox or Internet Explorer.

This is a common occurrence and is likely attributed to the fact that Google Chrome already includes an internal installation of the Flash player. This means that if you also download another version of Flash on your own, the player will slow down or crash more frequently.

Here’s is a possible shockwave flash crash Google Chrome solution:

1. Open up a new tab in Chrome.

2. In the address bar, type “about:plugins”.

3. Press enter.

4. You will see a list of all the plug-ins you have installed for Chrome. If you scroll down the list a bit, you should see “Flash (2 files)” or “Flash (3 files)”.

5. Click “[+] Details” in the upper right-hand corner of the window.

6. Go back down to the Flash entry. You will see that one Flash version is for the internal Chrome installation (…Google\Chrome\Application…) and that one is for your OS installation (…Macromed\Flash…).

7. Click the “Disable” link for the Google Chrome version.

8. Exit out of this tab.

9. Close the Chrome browser.

10. Open it back up.

11. Go to Adobe Flash Player’s test page to make sure everything is working smoothly again.

If it is not working, try going back to the plug-ins list and re-enable the Google version. Disable your other version. Try closing and re-opening your browser and resume your normal browsing.

If you are still experiencing the problem, try contacting a computer specialist to help solve the issue. Check out TalkLocal, a free service that will connect you with reputable, top-quality professionals in your area who can cater to all your needs. Just enter in your problem, location, and availability into the online service request and–within minutes–professionals with solutions will call YOU directly.

How you can Fix Registry Errors on your Computer

Thursday, August 16th, 2012

How you can Fix Registry Errors on your Computer Computer Repair

Your computer registry contains information about your installations and updates.  It is recommended that you clean and fix your registry regularly because it can become bloated with unused files.  However, before you start emptying your registry you should back your files.  If you are using Windows, follow these steps to back your registry.  Continue reading for more information on how you can fix registry errors on your computer.

Back up Registry

1.   Click the Start menu.

2.   Click “Run.”

3.   Type “ntbackup.exe” in the command.

4.   Click “OK.”

Now that your files are back, you can either download an automatic cleaner or fix your registry manually.  If you do not want to spend money fixing your registry, there are a handful of free programs you can download online.

Fix Registry Automatically

1.    Look for a command that automatically scans and fixes your registry.

2.   Quit all other programs besides the registry cleaner.

3.   Run the registry cleaner.  Even though it is an automatic cleaner, it is better to monitor what the program is deleting instead of blindly letting it clear your files.  Many programs have a setting that allows you to approve of its suggestions before it performs them.

4.   Schedule the cleaner to regularly scan your registry.  If the program does not have that option, schedule reminders to run the program.

If you want total reign over deleting files, read the following steps:

Fix Registry Manually

1.   Click the Start menu.

2.   Click “Run.”

3.   Type regedit.exe.  You now have an overview of all your registry’s files.

4.   Delete any files that you do not use.  Some files are not clearly marked, so make sure you do some research before deleting unfamiliar files.

You can also speed up your computer by following these steps:

1.   Click the Start menu.

2.   Click “Run.”

3.   Type regedit.

4.   Find the following registry key:

HKEY_LOCAL_MACHINE> SYSTEM >CurrentControlSet>Control>Session Manager>Memory Management> PrefetchParameters

5.   Change the EnablePrefetcher number from 3 to 5.

6.   Restart your computer.

If you are still having problems with your registry, contact a professional to assess your situation.  l can connect you with high rated IT support services in your area.  Just fill out a short service request online to talk with a professional in minutes!

How to Clean Computer Fan with Compressed Air

Thursday, August 16th, 2012

How to Clean Computer Fan with Compressed Air Computer Repair

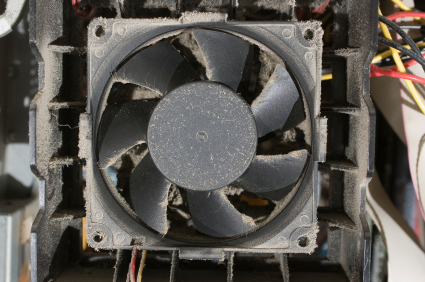
Dust inside a computer can cause slow performance, component failure, and fan failure. To keep it running smoothly, it is important to clean your computer fan at least a few times a year. Unfortunately, cleaning a computer fan is a risky action if you don’t know what you are doing, so read these instructions carefully to learn how to clean computer fan with compressed air.

Start by gathering your materials: a screwdriver that you can use to open your computer, a can of compressed air (designed to be static free), and a gas/dust mask to deal with all the dust. Next, shut down your machine (using the master power switch if it has one) and unplug any cables from the computer itself. Next, move to a comfortable, clean location where the dust can ventilate properly.

Time to open the computer! Take a picture before you start in case you want something to use as a reference later on. If you still have the user manual, it would be wise to consult it to find which areas you need to unscrew to open your computer properly. If you don’t have the manual, most computers have screws that hold down the side panel. Remove these to open up your machine.

Before we start messing around with the interior of the computer, be certain to never touch the inside of your computer with your hands. Doing so can destroy your computer because of electrostatic discharge. Just like you can be shocked by static if you rub your hands on a carpet, you can discharge static electricity into a computer, which has the potential to disrupt and destroy hardware components.

In light of this, use the compressed air to blow out the inside of your machine. Keep the can upright at all times to make sure no liquid spills out of the can. You’ll want to keep the can at least a few inches away from any interior parts. It is also good practice to begin from the top of the computer and systematically work your way down to ensure all the dust is removed.

Once all the other parts have been cleaned, move onto the computer fan. This is the last step because having dust accumulated in different areas will make cleaning the fan inefficient. To clean the computer fan, hold the can of compressed air roughly six inches away and spray directly at the fan from several different angles. Continue this process until all traces of dust are gone.

Now you can reassemble the computer. This step should be simple, but if you have trouble remembering where the pieces were before dismantling, refer to the pictures you took. When everything is back together and the cables plugged in, your computer will be running significantly cooler and faster.

If you would prefer to have a professional look at it, consider using TalkLocal. TalkLocal is a free service that will connect you with top-quality, reputable computer repair companies in your neighborhood within minutes. Just enter in your specific problem, location and availability, and up to three companies will call YOU directly, saving you the time and stress of finding one yourself.

Document Stuck In Print Queue Windows 7

Wednesday, August 15th, 2012

Document Stuck In Print Queue Windows 7

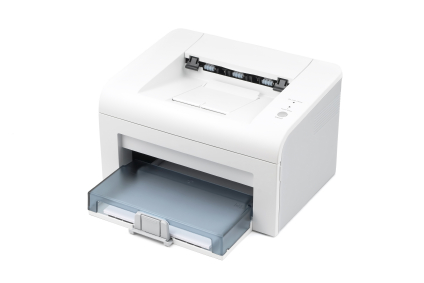
The printer is the “brat” of the computer peripherals. Printer problems are an aggravating experience, especially when you are trying to print a document that is due in the next hour. One of many problems that occur with printers is a document being stuck in a print queue. There are various common mistakes made when trying to fix this problem. Deletion or cancelation of the document in the queue will usually not do anything besides causing the document to be stuck in deletion or cancelation. Testing the printer will only increase the documents in the print queue. There is an easy way to relief this problem in a few simple steps by clearing the print queue manually.

Print Queue Info

There are many applications with a print function. To stop the printer from printing documents from different application all at once, the “print queue” application sequences the printing process. When a document is finished printing, the next requested document begins to print. The print queue is achieved by a “Print Spool” service. Each printer connected to the computer has its own print queue.

Before Clearing Queue Manually

Before even clearing manually the print queue, look at the regular signs of why the document has not printed. Remember if any dialog box came up about of the printer’s status when requesting the print. This usually means the printer is out of ink or out of paper. If so, reload these items accordingly.

Clearing Queue Manually

1. Click the Start Button.

2. Search for “Administrative Tools” in the search box.

3. Click on it.

4. Click “Services.” A “Windows Management” window should pop up.

5. Click on “Print Spool.” You may need to scroll down to find it.

6. Click “Stop” on the left side of the window.

This should clear the print queue so you can finally print out the documents you need. If manually clearing the queue does not work or the problem persists, call TalkLocal to talk to local computer repair services.

Web page prints in HTML

Wednesday, August 15th, 2012

Web page prints in HTML Computer Repair

If you want to print out a Web page in Internet Explorer and only to find to your dismay that the web page prints in HTML source code instead, don’t despair!  It’s usually caused by a single setting that can be easily changed and you’ll be printing regular pages in no time!

Why does this happen?

This problem usually occurs due to one of two different causes.  One possibility is that the temporary files (.tmp) that were used to print the web page were associated with a text editor (like Notepad), and as a result, these temp files were converted to text when sent to the printer.  Another possibility is that certain Internet Explorer settings were changed after installing new add-ons or during usage–both can inadvertently cause your web pages to print in HTML.

How do I solve this problem?

There is one simple way to solve this problem, which will work for the majority of the cases: Reset Internet Explorer’s settings back to default.  All you have to do is open Internet Explorer, click “Tools”, and then click “Internet Options.”  Under the Advanced tab, there will be a “Reset Internet Explorer Settings” options; click that button.

Your web pages should be printing normally now. However, if this solution didn’t solve your issue, it’s highly suggested that you change web browsers to alternatives such as Google Chrome or Mozilla Firefox.  Both of those browsers usually don’t have issues when it comes to printing out web pages in the correct format.

Ultimately, if none of the above options worked, then you should use TalkLocal to contact a IT professional near you today.  TalkLocal will automatically choose the best quality professional in your area in just minutes, saving you time and money to spend on more important things!

Security Precautions to Protect IT Systems and Data

Tuesday, August 14th, 2012

Security Precautions to Protect IT Systems and Data Computer Repair

With the decreasing size of data storing units, stealing data has been an increasing issue. It is recommended that you take necessary security precautions to protect IT systems and data.  Interestingly, the majority of the time data is stolen, it is from disgruntled employees or others with easy access to the data and IT systems.

The following are a few helpful tips to protect your systems:

–       Install anti-virus software.

–       Disconnect from the internet when you are not using it.

–       Use various passwords for different accounts, and ones that would be hard to figure out if you were an outsider.

–       Do not open email from suspicious or unknown sources.

–       Keep data storing or data transferring machines out of places that could be easily observed, (such as away from windows, etc.)

–       Require all workers to either log off or shut down their computers before leaving the building.

–       Shred all documents no longer being used.

–       Do not allow outside people to connect to your network – even if they are visiting your building or home only for a brief time.

In addition, check out these security precautions for more helpful tips.  Unfortunately, no matter how hard you try, sometimes you’ll still get viruses.  It may be beneficial to contact a professional to understand and equip yourself with the latest security systems out there.  To speak to a professional within minutes, use TalkLocal.  This completely free service will directly connect you to multiple computer repair specialists in your area.

Cannot Find Wireless Connection

Tuesday, August 14th, 2012

Cannot Find Wireless Connection Computer Repair

A wireless connection can feel like freedom when you are traveling from place to place. But when you cannot find wireless connection, the freedom slips slowly away. If you are a Windows user and are looking for a connection, click Start and then click Connect to. If your computer does not find a network, check the following points:

– Make sure your wireless switch is turned on. Some mobile PCs have a switch on the front or the side, while others use a combination of keys. Check your computer’s instruction manual if you are unsure.

– Make sure your wireless router is working. Ensure that you have turned on your router and that the signal light is on. If it is, try resetting the router by turning it off for a minute before turning it back on.

– Make sure you are close enough to the router. For 802.11b or 802.11g routers, the computer must be within 150 feet of the router.

– Remove interfering devices. Some devices, such as microwave ovens and cordless phones, may use the same frequency as your network. Try turning these devices off and moving them away from the computer.

– Remove other computers. If several computers are using the same router, the router may be too busy to handle new requests. Try disconnecting other computers before connecting yours to the network.

– See if administrator blocked access. An administrator may have used Group Policy to block access to certain corporate networks that you are trying to connect to. Contact your network administrator to gain access.

If you are still having trouble finding a wireless connection, you may need to have a professional check out your computer. TalkLocal can connect you to up to three local service providers in minutes! Just state your problem, location, and availability in our online request form.

How Do I Secure My Wi Fi Connection

Monday, August 13th, 2012

How Do I Secure My Wi Fi Connection Computer Repair

Almost all of us are guilty of jumping onto someone else’s unsecured Wi-Fi network; this also means many of us have shared our connection network with some stranger. While this can be fine if it was an honest person looking for an Internet connection, keeping an unsecured network poses certain risks. Unsecured networks allow others to see exactly what you’re doing on your network. This can have plenty of bad consequences if accessed by the wrong person. You might be wondering, how do I secure my wi fi connection? Follow these steps to ensure that no one intercepts your Internet traffic:

Enable your router’s WEP or WPA encryption–Encryption is the first line of defense for your Wi-Fi network. It secures information transmitted between your computer and wireless router by encoding the data. If you have not already, enable your router’s encryption and use the strongest form supported by your network. You can do this under your computer’s system settings. The Wireless Protected Access (WPA) protocol and more recent WPA2 have replaced the older and less secure Wireless Encryption Protocol (WEP). Go with WPA or WPA2 whenever possible. Make sure to use a strong password for your encryption key, such as a combination of letters and numbers of 14 characters or more. Also, change the default network name and password on your router. This will make it more difficult for hackers to break into your router.

Secure your notebook at public Wi-Fi hotspots–Most public Wi-Fi connections do not use encryption, so you should assume that anyone could see your Internet traffic unless you take precautions. Use these tips to stay safe:

– Make sure it’s a legitimate hotspot and not a malicious pirate router.

– Verify that your PC’s software firewall is turned on and that Windows’ file-sharing feature is off.

– Never send bank passwords, credit card numbers, confidential e-mail, or other sensitive data unless you are sure you are on a secure site. Check for the lock icon in the bottom-right corner of your browser, as well as a URL in the address bar that begins with https.

– Always turn your Wi-Fi radio off when you are not at a hotspot.

Use a virtual private network–VPNs keep your communications safe by creating secure “tunnels” through which your encrypted data travels. Many companies provide VPN service to their mobile and offsite workers, so check with your company’s IT department for connection instructions. Paid VPN services are also available online.

If you need additional help with securing your Wi-Fi network, contact TalkLocal to get in touch with high rated IT support services near you.

Virus Hides Folders and Files

Monday, August 13th, 2012

Virus Hides Folders and Files Computer RepairViruses are never good news for your computer.  They can come from programs you download, videos you watch, cookies you get from sites you visit, and many other places.  The Internet is a less than secure environment and you can easily be exposed to getting viruses on your computer.

One type of virus that you might contract could cause many of your folders and files to be hidden.  When a virus hides folders and files, it becomes very inconvenient because then you do not have access to many of the things you need. Viruses like this come from fake anti-virus or utility programs.  These can be trial software or incorrectly labeled downloads.  By hiding your documents, the virus pretends that your computer is infected or has problems so you will freak out and be tricked into paying for the full version of the software that can supposedly fix the problem.  The last thing you want to do in this case is pay because then you have a bigger more serious virus and you also have given away your credit card information to an untrustworthy source.

The first thing you need to do when you contract a virus that hides your files is to remove it.  You should carefully research programs that can scan your computer, find viruses, and delete them.  The next step  is to find all the hidden folders and files.  You should go to Tools > Folder Options, which will open a menu.  From there click on View >  Show Hidden Files > the folder you want to view.  You will be able to see everything that the virus had hidden.  You can either manually click on each folder/file individually and unhide it through the command prompt by changing the hidden attribute.  This is a long and tedious process.  There is an easier way that automatically unhides all the programs.  You can download the unhide.exe program from Bleeping Computer and use it to recognize and unhide the files.  The process takes about 30 minutes depending on how many files need to be addressed.

If you cannot get these step to work or are still missing some files you should seek professional help.  Use TalkLocal to contact a reliable local IT business within minutes.  Simply input your problem and availability and TalkLocal will do the rest.  You don’t have to do any work and you will be connected with a company almost immediately.