Archive for the ‘Handyman’ Category


Wood Putty vs Wood Filler: Is There A Difference?

Friday, November 29th, 2013

Wood Putty vs. Wood Filler: Is There A Difference? - Handyman

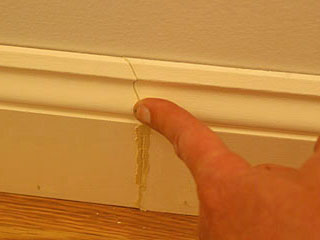
Although wood putty and wood filler were invented pretty much for the same reason, to fill gaps in wood like cracks, dents, knotholes, and seams, they are not entirely alike. Using wood putty when you should be using wood filler (and vice versa) can produce disastrous results. If you are planning a do-it-yourself repair on wooden furniture and other parts of your home, understand the differences between wood putty vs wood filler.

Wood Filler

Wood filler is water-based. It is made from clay, latex, lacquer, polyurethane, or epoxy, and they are similar in texture. To achieve a look that’s very similar to wood, you can mix it with sawdust or dye in the same color as the item you are mending. Wood filler is rather easy to apply, and dries up about 10 minutes after application.

The advantages of wood filler are many. It can be easily mixed with coloring pigments and additives to improve texture. It allows you to finish the job faster and can be easily cleaned. There are cases, however, when it is better to use wood putty.

Wood Putty

Wood putty is made from calcium carbonate and oil, and is easy to dye. This material is used primarily for oil-based finishes. Although this narrows down its uses, it lasts longer inside its container that wood filler, so it often ends up being the cheaper choice.

Another disadvantage of wood putty is that it requires more drying time. It can take 48 hours or two whole weeks to cure completely. Once done, you might have to wash off an oil residue from the finished product.

Do you have small holes on the surface of your walls and furniture? Wood putty will do a good job of making them look brand new, but do not use this repair product on water-based finishes.

So, What’s Your Decision?

The choice between wood putty vs wood filler really depends on what your situation is. What kind of wood finishing are you dealing with? Are you trying to look for the most cost effective solution? Are you in a hurry? We hope these tips help make the smart choice.

If you are looking to purchase wood putty, you can get it shipped overnight starting at $6.07. You can also find wood filler on Amazon and have it shipped overnight starting at $6.88.

If you would like more help with your DIY project, try speaking with a professional handyman in your area. TalkLocal will connect you with up to three handymen in just minutes, for free.

The owner of this website is a participant in the Amazon Services LLC Associates Program, an affiliate advertising program designed to provide a means for sites to earn advertising fees by advertising and linking to Amazon properties including, but not limited to, amazon.com, endless.com, myhabit.com, smallparts.com, or amazonwireless.com.

What are Knock-down Fasteners?

Wednesday, November 27th, 2013

What are Knock-down Fasteners? - Handyman

Knock-down fasteners are clever pieces of hardware that are used to make a butt joint, which is the simplest technique to join two members together. The members must be cut to the correct length and butted together at the right angle. The members are glued together and are usually reinforced by several methods. Knock-down fasteners are a common example of a reinforced butt joint.

Typical Use

It’s called “knock-down” because you can simply knock it down however many times to assemble and re-assemble it. If you’ve ever purchased flat-pack furniture, then you have seen and used knock-down fasteners.

Flat-pack furniture is ready-to-assemble furniture that is very popular these days, from bookshelves and cabinets, to drawers and modular kitchen partitions. When you purchase flat-pack furniture, it comes in individual components that have been pre-cut, pre-drilled, and are meant to be held together by knock-down fasteners.

These fasteners differ from wall anchors, which are used to attach the assembled shelving to a wall. While these fasteners connect and disconnect easily, they do make a pretty strong joint connection. This allows furniture manufacturers to use an inexpensive and weak material, such as a particleboard, and still end up with a stable and strong product.

How Do They Work?

Usually, knock-down fasteners comprise of cam dowels that are locked by confirmat fasteners, or cam locks, that are installed alongside the members to bring them together. The cam lock is tightened to secure the joint.

Types of Knock-down Fasteners

There are several styles of these fasteners, the most common ones are:

– Cross-dowel – Ideal for butt joints that will not hold a lot of strain; easy way to join two members that form a 90-degree angle.

– Draw bolts – Perfect for heavy-duty use where the joint requires a lot of support.

– Connector bolts – Consist of the bolts and cap nuts; provide a clean look and comes in an attractive finish so they can be used in visible areas; great to use to attach bookcases or cabinets.

Still Need Help?

Knock-down fasteners are widely available in hardware supply stores. If you’re working on a furniture project and need some professional handyman help, TalkLocal can link you with someone in your area who is well qualified to offer expert assistance. Try our free service now!

How to Use Wood Putty like a Pro

Tuesday, November 26th, 2013

How to Use Wood Putty like a Pro - Handyman

Here is a brief guide on how to use wood putty like professional handyman. Out of the many types of filling materials for cracks, dents, and holes in wood, let’s focus on petroleum-based wood putty for now.

Before anything else, remember what wood putty cannot do for you. It does not improve the structural stability of a door frame, wall, or piece of furniture, and it doesn’t have adhesive capabilities. It cannot bond objects together. Using wood putty is best for improving the appearance of a wooden object. It is mainly a matter of aesthetics.

Tips to Use Wood Putty

1. You can use dye to match your wood putty to the color and texture of the wood. You want the material to blend in and not stand out like a sore thumb.

2. Although wood putty can be sanded off, don’t use too much. Not only is this wasteful, it makes the task of sanding off extra hard, even risking damage to the object you want to repair. When it dries, wood putty can be rather hard.

3. Work fast before the petroleum-based wood putty dries up. This part takes a little bit of experience, so the more research you do on how to use wood putty properly, the better your finished product will be.

4. Press the area you’re working on with your finger and follow through with a putty knife, wiping off the excess before it dries. Acetone can be used to clean up wood putty, but if you do this part right, you won’t need the acetone clean up at all.

5. It takes 30 minutes to an hour for the wood putty to harden. After that, sand with an oscillating sander. Use a cloth to wipe off the dust.

It sounds easy enough on paper, but do-it-yourself projects like this takes some getting used to. If you are not entirely happy with your work, don’t worry. You’ll improve over time.

Find Professional Help

And if you would prefer to have a professional handyman help you around the house, just use TalkLocal to find one. We will connect you with up to three professionals in your area, allowing you to speak with the right professionals, right now.

How to Use a Shave Horse

Friday, November 22nd, 2013

How to Use a Shave Horse - Handyman

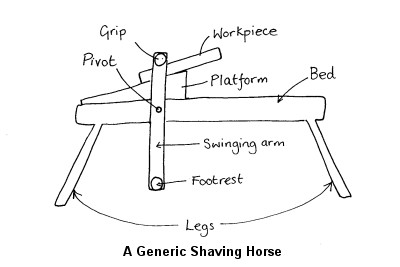
A shave horse is a traditional tool that is used for green wood projects. The shave horse is used to hold a length of wood while that wood is being shaped and worked on with a spoke shave or drawknife. The shaving horse got its name from the fact that it is designed to resemble a horse, having legs and a flat surface that the user mounts in order to operate the tool.

Material Used

The ideal material used with a shave horse is green wood, which is any timber that has been recently cut or fallen from trees after a storm and not yet seasoned. Green wood is easy to shape using hand tools since it is soft, due to its high moisture content.

Using a Shave Horse

You’re probably wondering now how to use a shave horse.

1. First of all, a shave horse is foot operated to allow the hands of the woodworker to be free to shape a piece of wood.

2. To use it, the worker must first mount the bed or plank. From each side of the shave horse, there’s a bar extending from under it. The worker must place each foot on each of the bar’s end.

3. When the feet push the bar forward, the wood being worked on is clamped by a wedge above the bed against another bar. The wood is released when the feet are removed from the underside bar.

4. By adjusting the wedge, the worker can quickly reposition the wood as necessary during the shaving.

What Can You Make with a Shave Horse?

Now that you have an idea how to use a shave horse, you may be interested to give it a try to create your own wood projects. A shave horse is typically used to create round shapes from square wooden pieces. Some of the items commonly made using shave horses are chair legs, brooms, wooden spoons, walking sticks, and tent pegs.

Shave Horse Safety

One very important thing when learning how to use a shave horse is safety. It is quite safe to use as long as you learn its correct usage. Also, always be responsible if using any dangerous tool while on a shave horse. However, never use a circular saw while sitting astride a shave horse.

If you would like to have a shave horse built for you by a professional, let TalkLocal help you find the best professional. Contact us and we’ll get you in touch with competent professionals quickly and for free.

Fix Mailbox Door

Monday, November 18th, 2013

Fix Mailbox Door - Handyman

Can’t close the door of your mailbox? Defective mailbox doors are a common problem that upsets numerous homeowners. Some of them choose to repair or replace it on their own, while others go in favor of timely, professional services ensured by a trusted local handyman. If you think that the first alternative is right for you, check out the following guidelines to fix mailbox door in two simple steps without any help from a specialist.

Step 1: Diagnose Your Problem

Start by identifying the nature and extent of your problem. Your door may not close properly for various reasons including deterioration, rusty pop rivets, or external damage, such as severe weather.

Newer mailboxes made of cheap materials are usually inexpensive and unreliable. Homeowners try to fix them by reattaching the door using tape and even chewing gum. However, these solutions are temporary and deliver less than satisfactory results.

Step 2: Find the Perfect Long-term Solution to Your Problem

If you want to fix mailbox door and make sure it stays in place for the longest period of time, use nut mail magnets. Apply tiny magnets on your mailbox to keep the door closed at all times, even the worst weather conditions. If nut mail magnets are placed correctly, they do their job for several months in a row.

Here’s a great extra tip: make sure you rub the whole area with alcohol before sticking the commercial Velcro piece on the interior side of your mailbox. This is, by far, the simplest method to fix mailbox door.

You don’t need any special tools or skills, and the nut mail magnets work equally well on brick,  plastic, metal, and wood surfaces, so they are great for any type of mailbox. You can glue the magnet in a few minutes, by simply applying a powerful adhesive, like 3M Dual-LockTM, for instance.

Ask an Expert

If you simply can’t fix your mailbox door on your own, don’t hesitate to ask for expert help. Use TalkLocal to connect with up to three professional handymen in your area, in just minutes.

What to Do If You Find Your USPS Mailbox Broken

Thursday, November 14th, 2013

What to Do If You Find Your USPS Mailbox Broken - Handyman

United States Postal Service (USPS) mailboxes are designed and installed according to specific standards. If you find your USPS mailbox broken or damaged in any way, by accident or as a result of daily wear and tear, you should follow some guidelines when fixing it. If you need a new mailbox, you can find some of the top rated mailboxes from Amazon, starting at $26.22 and have it shipped overnight.

To deliver your mail, the USPS requires you to be familiar with its standards and make sure that the area surrounding the mailbox is accessible. Here’s what you should know if one day you find your USPS mailbox broken.

Notify the Local Postal Service

Before installing a new USPS mailbox it’s best to notify your local post office. The same goes for mailbox replacement or relocation.

Get Approval for Your Mailbox

If you find your USPS mailbox broken  and it really can’t be fixed, you should purchase a new one from a shop which sells mailboxes approved by the Postmaster. If you want a customized mailbox, you’ll need approval before installing it.

Get the Identification Right

USPS mailboxes must follow certain rules as far as identification is concerned. You should use at least one inch letters to write your name on the mailbox. Also, the name of the street and the street number should be inscribed both on the front of the mailbox and on the side to allow the mailman to see it when approaching.

The Height and Locks of the USPS Mailbox

USPS mailboxes should be 41-45 inches in height, starting from the ground. If your mailbox is locked, it should have a frontal slot which allows the postal worker to slide the mail in easily.

Purchasing a new USPS Mailboxes

If your USPS mailbox is not repairable or salvageable, it may be more affordable and efficient of your time to purchase a new mailbox. You can purchase a brand new USPS mailbox from Amazon, starting at $26.22 and have it shipped overnight. Once you have purchased a new USPS mailbox, TalkLocal can help you find a local handyman who help you to install it at an affordable cost.

Refrain from Sticking Ads on USPS Mailboxes

Advertising is not allowed on USPS mailboxes, so keep your mailbox clean and clear of ads to comply with USPS standards.

Ensure Access to Your USPS Mailbox

It is your duty as an owner to provide access to your USPS mailbox if you want your mail to be delivered. If the postal worker does not have access to your mailbox because it’s covered by snow, or it’s blocked by a vehicle or a garbage bin, you won’t get your mail delivered.

Can’t Fix Your Mailbox?

If you need help to fix your USPS mailbox or install a new one, TalkLocal can connect you with local handymen who can do the job in the shortest amount of time. Our service is fast and free.

5 Ways to Winterize Your Home

Wednesday, November 6th, 2013

5 Ways to Winterize Your Home - Handyman

Every autumn, you begin preparing for the cold months ahead. You take out our snow boots, bring in the firewood, and buy loads of hot cocoa. But what about your house? Is it prepared for the winter? Winterizing your home can lower heating bills and prevent property damage. Here are 5 ways to winterize your home!

5 Ways to Winterize Your Home

1. Check your Chimney: This winter you may be planning to curl up next to the warm fireplace and watch movies. Before bringing in that firewood, get your chimney inspected. Foreign objects (birds, tennis balls, etc.) commonly end up in chimneys.

Buy a protective screen cap for your chimney to keep out foreign objects and rain that can damage fireplace walls. To lower your heating bills, close the chimney damper on the fireplace when it is not in use.

2. Clean your Gutters: To prevent ice dams that back up water and lead to water leakages in the house, clean your gutters. Fallen leaves and other debris can clog gutters and cause leakages. Look for leaks and misaligned pipes when cleaning gutters with a hose.

3. Reverse your fans: During the summer, fans push the hot air upward, leaving you in a cool, comfortable room. For the winter, reverse your fans so hot air is pushed downward. Reversing your fans can warm your house without growing heating bills.

4. Seal your Ducts: Your home’s duct system connects tubes in the walls, floors, and ceilings. It carries heated air to vents in each room. The U.S. Department of Energy reports that ducts that leak heated air can add hundreds of dollars a year to heating and cooling bills. If you’re installing new ducts, make sure it comes with insulation.

5. Stop Leaks: Closing leaks can lower your heating bills and keep insects from crawling around your house. Buy door sweeps to close spaces under exterior doors. Buy caulk or caulk substitutes to close up drafty spots in recessed lighting, electrical outlets, etc. Use weather resistant caulk for the outside of your house.

Need More Winterizing Help?

Unsure if you can winterize your house on your own? Don’t freak out! There are plenty of local professionals who want to help. Use TalkLocal to contact a local professional who can winterize your house, lower your heating bills, and prevent property damage!

How to Join Cold Resistant Plastic PVC Pipes Together

Friday, November 1st, 2013

How to Join Cold Resistant Plastic PVC Pipes - Handyman

Cold resistant plastic PVC piping is not difficult to install and can be beneficial in cold weather. Plastic piping is very easy to work with because it’s easy to cut and join together to fit most applications. The best piping to use for very cold weather is PVC piping, because these pipes are cold resistant plastic PVC.

There are many sizes of PVC piping on the market, and you can choose which ones would suit your needs. Make sure to choose PVC pipes that are of good quality, without any cracks, so they will not leak. For working with PVC pipes, you will need some of the tools in your carpentry tools list.

Solvent Welding

Solvent welding is the process used to join plastic pipes in order to properly prevent any leaks. This is a five-step process that is relatively simple to accomplish.

1. You need to inspect the length of your pipes for any cracks or leaks. You also need to inspect the fitting sockets and the gouges for any dirt, abrasions, and cracks. These are bad for your pipes. If the pipe that you have is imperfect, cut off the imperfect part to expose a better end for the fitting.

2. Purchase the pipe and the fitting from the same manufacturer. If this is not the case, place the two together and hold the pipe along with the fitting upside down and ensure that the fitting doesn’t fall off.

3. Cut the pipes using a saw-tooth or PVC pipe cutter. Do not use sandpaper on the edges of the PVC pipes because you will take out too much material.

4. Apply a good quality cleaner or primer to the edges of the pipe. This will prepare the pipe for solvent cement action.

5. Brush on a coat of solvent cement that is appropriate for the type of pipe that you are using.

Need Help?

Contact TalkLocal today and let us connect you with a professional handyman or plumber near you who can help you with PVC pipes!

Cold Resistant Plastic in the Home

Thursday, October 31st, 2013

Cold Resistant Plastic in the Home - Handyman

Cold resistant plastic pipes have many advantages over metal pipes. The heat transfer between plastic pipes and the surrounding ambient air is lower, leading to less heat loss. Additionally, colder water and materials can pass through the pipe without causing the pipe to ‘sweat.’ Thus, they need less insulation than metal pipes.

Cold resistant plastic piping sections are also easier to connect together using solvent cement and are easier to cut to desired lengths using basic tools from your carpentry tools list. Two good examples of cold resistant plastic types are polymers and acrylics.

Polymers

Polymers are made up of chains of chemical bonds (usually hydrocarbon) that make them both heat and cold resistant. These plastics have many applications inside the home.

Examples of polymers that are used around the home are Teflon pans, polythene shopping bags, polyester and nylon clothes, and rubber. These cold resistant plastics have many uses around the home because they are versatile and readily accessible. When used around the house, they are lightweight and versatile. They are able to withstand extreme temperatures and can be used in a variety of ways.

Acrylics

Acrylics are plastics that are derived from acrylic acid. The most commonly used acrylic in the home is polymethyl methacrylate, which is used to make Plexiglass, Crystallite, and Lucite. These types of plastics are often used in place of glass because they are clear and able to withstand extreme temperatures.

Around the home, acrylics are clear, tough, and are used to make lighting equipment. This is because they produce non-toxic smoke in the event of a fire. These cold resistant plastics are essential to every home, and even the automobile industry is using acrylics in place of glass.

Need Expert Advice?

Want plastic piping installed in your home, or need help repairing cold resistant plastics? Contact TalkLocal today and see how we can help you find a handyman near you!

What is a Froe?

Tuesday, October 22nd, 2013

What is a Froe? - Handyman

What is a froe? A froe is a carpentry tool that is L-shaped and is used to split wood along its grain. It is used by hammering the blade into the wood in the direction of the grain and then twisting the haft, thereby twisting the blade. It is more accurate than using a hatchet.

The froe uses the haft to split the wood by multiplying the force, thus, very little force is needed to split the wood. It is part of a carpentry tools list because it is very effective at splitting wood.

A froe is also called a shake axe and is similar in form to an axe. A froe is an assembly of a blade set at a right angle to a haft. There are some variations to the froe, with some froes not having any handles, but instead having an unbevelled edge that serves as a handle.

How to Use a Froe

Using a froe is not difficult because the force applied is multiplied significantly by the haft. Using it is similar to using an axe, although it is much more precise and accurate.

1. The first thing that needs to be done is to position the wood correctly.

2. Then, find the grain of the wood and measure where you would like to cut.

3. After this, strike the area where you would like to cut using the blade of the froe.

4. Then, using the haft, twist the blade until the wood separates. These steps will ensure that the wood is cut accurately and that the force needed to cut the wood is not too much. The froe is a useful tool that many carpenters use.

Need Help with Your Froe?

TalkLocal can help you find a professional near your area within minutes! Call us today and we will assist you in finding an expert that can help you!