Archive for the ‘services’ Category


DIY Laminate Flooring Installation: Experience Q&A

Thursday, June 18th, 2015

shutterstock_250769293

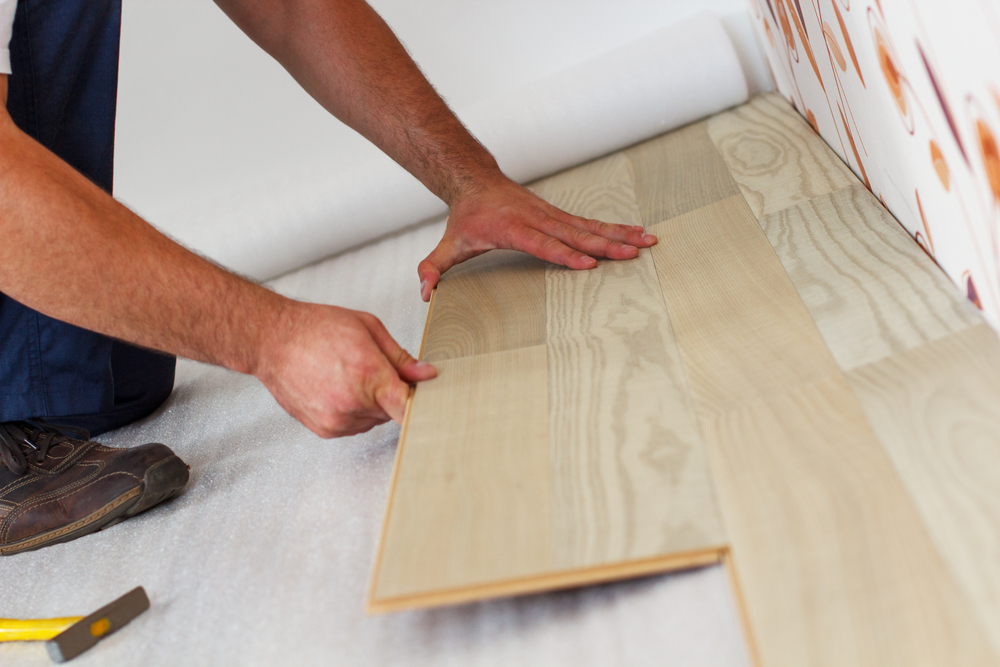
TalkLocal marketing strategist Dallea Caldwell recently renovated her own floors, replacing the kaleidoscope of carpet and vinyl and wood with a single layer of smooth Beachwood laminate. For those interested in DIY laminate flooring installation, we’ve interviewed her about the experience.

Q: Dallea, why did you decide to do your own renovation rather than hiring a professional contractor?

A: The big thing was the cost. I did a bit of research and found out I could save around $2000. I knew going in that I wanted to use laminate flooring – I’d seen Beachwood in stores and liked how it looked – and, as it turns out, laminate is pretty easy to install.

Q: Walk me through the process – what’s the first step in a DIY project like this?

A: Getting the proper materials. I had a bit of DIY experience so I knew right away, I was going to need mallets and saws – a bunch of them. Specifically, I needed round saws, handheld saws, rubber mallets, and these rubber plants called tappers, which are used to tap together the interlocking layers of the laminate. But the biggest thing was help: renovating flooring requires manpower! So I called up some family members and told them to bring other necessities, like crowbars, hammers, saws, siding and such.

Q: After everyone had arrived and you had all your tools, how did you start?

A: Part one, the hard part, was getting up the flooring you already have. It was quite a task due to the smorgasbord of flooring types in my open-layout first floor; it was like a crash course in floor ripping. All in all, it was a really time and labor intensive process, from cutting strips of carpet to finding and scraping linoleum glue to prying up wood boards – and don’t get me started on the hours spent pulling up and nailing down staples and nails. The staples were like an endless game of pop goes the weasel.

Q: Sounds taxing. Was this a messy undertaking?

A: Very much so. I wanted the new flooring to be level; that meant every little thing, regardless of its material, had to be swept clear before the new flooring was to be installed. This soon turned out to be a very dusty affair; if you’re allergic to dust, be sure to take your medication before starting this project. The other problem with dust is that, like sand, it will find its way everywhere. In my case, it infiltrated the cat food – the poor kitties were vomiting all night long.

Q: What was the next step?

A: Then comes the actual installation. At first, it seemed like it was going to be awful because the laminate seller had unloaded this mountain of planks from an eighteen wheeler right in my garage; having to move the planks from place to place was honestly the hardest part. Installing was easier. You see, the trick is to just move in a linear fashion, like you’re mowing a lawn. The laminate we chose already had padding, and the laminate interlocks so that few pails were needed, so it was just a matter of lining everything up. As long as you keep moving in single directions, you’ll be able to cut the material to fit tight or peculiarly shaped areas. Which reminds me: this step requires some serious sawing. I had a great table saw, which only required an hour’s assembly, and was critical for precise cutting; you don’t want to waste wood, especially when a 1×2” plank bridges the space between the laminate and the wall.

Q: This all sounds like a ton of work. Was it worth it?

A: Sure, it was all hard, but remember: $2084 in savings. And the satisfaction of knowing that I made the floor myself, seeing the floor transform from an ugly patchwork to a beautiful, smooth surface – it was fantastic. Surprisingly, it proved not a bad family weekend.

And there you have it. However, some projects are too expansive to tackle even with your entire extended family. These are best handled by a professional. Head to TalkLocal and we’ll quickly set you up with the perfect contractor for free and without any hassle.

DIY Dads: The Rise and Fall of the Household Handyman

Monday, June 15th, 2015

shutterstock_264151898

Give a dad an inch and he’ll take a mile.

You know the story: he moves from paintbrushes to power washers to piles of random wrenches with a growing hardware store addiction. This is the evolution of the “Household Handyman,” the dad-turned-DIY specialist. For my dad, the transformation started when our boiler broke one fall.

A banker, he had little business intervening but he wasn’t going out without a fight. Within minutes, the hawk in a suit and tie had donned his worst t-shirt and shorts (“in case it got greasy”) and was intent on finding the Household Handyman’s Holy Grail: the boiler instruction manual.

One problem: the boiler was ten years old…finding yesterday’s instruction manual is hard enough. So, he went a-rummaging through parts of the house I didn’t know existed to emerge from the garage a half hour later, manual in hand, ambition in his eyes. It was exciting to see him march into the dark boiler room.

But Dad’s momentum soon turned to confusion, not that he couldn’t have figured the boiler out, but the chances didn’t look great; his head turned to the side at the oversized manual, a random piece of metal in his left hand. He had one trick left up his sleeve, though.

It was an old trick that he learned from Steve. Steve was a neighbor of ours and also happened to be my best friend’s dad. He was great – always there with us to play catch, drive us to the movie theater, coach our baseball team. He was a very involved father so he took all of his household maintenance tasks head-on.

At the end of the day, Steve was a tad more successful than my dad with this stuff (though he never tackled a mighty boiler). His first fix was a broken kitchen cabinet then he moved on to greater things and, before the end of the summer, he’d build his own white picket fence.

Steve’s house became a DIY playground and his next project was his roof shingling. What I didn’t tell you is that I grew up in South Carolina and Steve was so hot up there that, when he was hammering nails, a bead of sweat ran into his eye and that hammer went down right on his thumb! He didn’t surrender easily but some twenty minutes later he realized that he was moving very slowly, and had no choice but to reach into his pocket for Plan B.

What do my father’s and Steve’s Plan Bs have in common? They both involved a couch, a Heineken, the game, and a cell phone. There’s much a Household Handyman can do…but not even a 12-piece Allen key can provide a household with the convenience of a professional. Our boiler was fixed and Steve’s roof was shingled within a day.

In observance of Father’s Day, give your dedicated dad a break: see just how easy TalkLocal can make finding local service professionals.

How to Install a Flag for Flag Day

Friday, June 12th, 2015

Flag Day, June 16th, is quickly approaching – don’t neglect it. This holiday calls upon us to showcase our patriotism through displays of the American flag and its colors; a great way to do this, of course, is through hanging high the old Star Spangled Banner. If you’re interested in getting a residential flag pole so you can honor the Flag on its holiday, or whatever flags you care about any time of the year, make sure you’re doing it right with this easy guide on how to install a flag pole.

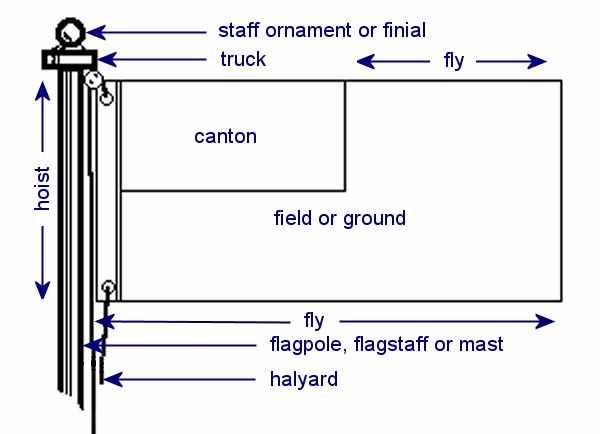
1)      First, familiarize yourself with the anatomy of a flagpole; these terms will be useful in the following steps. Here’s a helpful graphic from www.netstate.com:
Pic 1

A flag is composed of the following parts:

The hoist is the height of the flag when hung.

The field refers to the area of the flag, not including the upper-left quarter, which is called the canton.

The fly is the length of the flag – the space between where it joins the flagpole and the fly end, the far side of the flag.

A flagpole is composed of the following parts:

The flagpole is the tall metal cylinder that supports the flag.

The truck tops the flagpole, with holes from which pulleys are attached.

A halyard is the rope, threaded through the pulley on the truck, that raises and lowers the flag.

The finial is an ornament that rests atop the truck.

Another important part of the flagpole is the foundation, which supports the pole from deep in the ground. Here’s a diagram of the foundation from www.flagdesk.com:

Pic 2

This foundation dimension calculator will help determine the size of the foundation hole you need to dig.

2)      24 hours before installing the flagpole, dig your foundation hole to the dimensions called for by the calculator. Set the foundation sleeve into the center of the hole, using a level on top to ensure it is flat. Let the ground sleeve stick out of the ground by two inches. Add concrete around foundation sleeve to fill in the hole and mix in water intermittently to ensure uniform thickness. A concrete to water ratio of 4:1 is typically recommended.

3)      Some concrete will come with a collar, used to elevate certain areas of concrete. Place the collar in the wet concrete around the protruding foundation sleeve and fill the area between the two with concrete. This will be used to hold the shock collar, which will protect the foundation from water.

4)      Wait 24 hours for the concrete to dry.

5)      The next day, take the flagpole and rest it on two padded sawhorses. Measure to the center of the pole and drill holes for the cleat. The size and distance of these holes will be determined by the cleat you use.

6)      Most trucks can simply be screwed into the top of the flagpole, but if it doesn’t fit tightly enough, you can caulk it over before screwing it on. The truck should have a hole on top into which the finial is inserted.

7)      Cleat off the end of the halyard.

8)      Raise the flagpole into the foundation. It can be easier to tape the shock collar to the flagpole before doing this so it doesn’t obstruct raising the flag. This task is most safely done with three people.

9)      Caulk the shock collar to the concrete. Top the concrete with gravel to improve appearance.

This is a pretty heavy DIY project and takes a few days to complete. If you don’t have the time or aren’t feeling up to it, don’t let your Flag Day display suffer – head over to www.talklocal.com and we’ll find you the perfect handyman, free of charge and without the headache.

DIY Laminate Flooring: 5 Things you Need to Know

Saturday, June 6th, 2015

shutterstock_272247716

Laminate is a versatile and relatively inexpensive flooring option. It’s also easy to find; you won’t have to drive into a town you’ve never heard of to see a specialist selling the design you’re after. For those interested in installing, say, DIY laminate flooring or wondering how to install laminate flooring, here are five quick points about the material to make your life a bit easier.

1.      “Laminate” flooring refers to the lamination process. It’s like laminating a piece of paper; this process fuses layers of different materials to create something stronger, more versatile, and better insulated. A complete piece of laminate flooring consists of a compound layer, usually made of melamine resin.

2.      Different types of laminate flooring are fused in different ways. Most laminate needs to be “tapped” together with a special tool, but some types also require gluing. Though this requires more work, glued laminate is less prone to separating after installation. Lower quality, glueless laminate is the most prone to separation, typically needing to be “re-tapped” every so often.

3.      Laminate flooring comes with rubber underlaying, on which the pieces are positioned. This makes a DIY project much easier; it allows you to figure out how to cut and align the pieces of laminate before laying them down. It also lets you decide how to cut smaller pieces to fit special areas, such as edges, cupboards, and door entrances.

4.      Though relatively durable, laminate flooring requires occasional cleaning. Water, if left too long, can infiltrate planks and cause warping, and dust and dirt particles render it more susceptible to scratching.

5.      The vinyl top of laminate flooring is very versatile in appearance. There are types of vinyl top for almost any type of wood and, recently, for many times of stone, as well. This makes laminate flooring a great choice for almost any room in the house.

If you’re wondering how to install laminate flooring, check out this article, where we ask a TalkLocal employee about her experience installing her own laminate flooring so you can see how it’s done. If you don’t have the time or would prefer the expertise of a professional, head to TalkLocal – our free service will quickly connect you to a local handyman.

Dandelion Medicinal Benefits and Other Uses for The Pretty Ragweed

Wednesday, June 3rd, 2015

shutterstock_137674295

As pretty as they are, letting dandelions grow wild and unfettered is simply not an option. Sure, the golden blooms may call to mind the raw beauty of nature; but, the resulting unkempt lawn is bound to make you a neighborhood pariah, infecting the well-manicured lawns of any neighbor within a 5 mile radius with those airborne seedlings, and draw side-way glances and blame whenever property values drop. The problem with dandelions is that they are weeds (pretty weeds) and weeds don’t belong on the lawns of responsible homeowners. In other words, dandelions must die!

Of course, it’s still a shame to let anything beautiful go to waste, especially when you can use dandelion medicinal benefits to support your body among other things. So…

Here are 4 ways to get a bit more enjoyment out of this sunny infestation once you’ve rooted it out.

WARNING: lay off the weedkillers and fertilizers if you intend to try these tricks! And, if you or a family member have ragweed allergies, you should avoid contact with dandelions or consult a doctor prior to doing so.

Dine on Dandelion: The entire dandelion is edible and delicious, if properly prepared. Check out this recipe for Sweet and Sour Dandelion Greens for just one of countless meal ideas.

Delicious Dandelion Drinks: Dandelion also makes a great tea or wine. Just check out this four ingredient dandelion wine recipe.

Doctored by Dandelion: Dandelions when eaten are high in Vitamin K (74% daily dietary value) and Vitamin A (64%), as well as Calcium (19%) and Iron (24%). Dandelions are also celebrated for their possible medicinal properties as they contain chemicals which may reduce swelling and inflammation among other ailments. Check out this step-by-step process for making your own Dandelion Infused Oil to promote healthy skin.

Dandelion Your Dirt: With all the nutrition packed into those lawn destroying dandelions, it’s easy to see why dandelion fertilizer could end up being as good for your garden as it was bad for your lawn. Here’s the basic process for making fertilizer out of any unwanted weeds.

With the unassuming beauty of the dandelion, pulling them root to stem from the lawn can be rather bittersweet. After all, who hasn’t noticed how their unruly blooms swaying serenely in the unkempt fields along the highway make a long drive feel like a pleasant stroll in the park, or how they brighten even the most decrepit and dilapidated farm house with their sunny sprouts? And who can forget the childhood memories of sending their seedlings to the wind with a gentle blow and a little prayer? At least now you know how to put these surprisingly lovely ragweeds to use, even if you can’t allow their beauty to flourish in your lawn.

And, if you need help keeping your lawn pristine, find the right local landscaper by visiting  TalkLocal or the iPhone/Android app.

What is HVAC certification?

Wednesday, May 27th, 2015

HVAC certification

If you’re asking this question and you’re an aspiring home technician, you may want to keep reading. The Environmental Protection Agency requires that anyone who performs maintenance, service, repair and disposal of refrigerants must be heating, ventilating, and air conditioning (HVAC) certified. Certification involves passing an exam which focuses on different content depending on the degree of certification you wish to attain. There are 4 different levels of certification and each one tests you on certain types of HVAC related jobs. What is HVAC certification? Let’s break it down.

Type 1 certification

 HVAC technicians who primarily deal with small appliances like vending machines, window air conditioners, and domestic refrigerators are required to have this type of certification.

Type 2 certification

HVAC technicians who repair and dispose of equipment with high pressure refrigerants need to be cleared with type 2 certification. This means if you work with residential air conditioners, heat pumps, industrial refrigerators and the process of refrigeration in general, you need to have this certification.

Type 3 certification

HVAC technicians working with the disposal or service of equipment with low pressure refrigerants, like chillers, need to acquire type 3 certification.

Universal certification

If you plan on working with all of these types of HVAC equipment, you need universal certification. To acquire this clearance, you must pass the standardized EPA exam which includes 100 multiple choice questions in the following areas:

·         25 core questions

·         25 Type I questions

·         25 Type II questions

·         25 Type III questions

If you pass the universal certification exam, you will be clear to service all kinds of HVAC equipment.

How to train for HVAC certification

If you’re seeking certification in HVAC, you have two options for training. You may attend a wide array of vocational or technical schools which provide training, or you can become an apprentice to a full-fledged HVAC technician. Before taking the test, exam providers generally expect a candidate to have at least 1 year of installation experience and 2 years of maintenance and repair experience.

Here at TalkLocal we understand the importance of connecting our customers with only the most qualified technicians. All heating and cooling specialists we hire go through the rigorous HVAC certification process and are skilled, competent, hard-working individuals who can handle the jobs we send them.


3 Ways to Show Your Gratitude This Memorial Day

Thursday, May 21st, 2015

shutterstock_186196103

This Monday is our chance to say thank you to the men and women who paid the ultimate price defending our country. Traditions of how to observe Memorial Day vary widely; some people go to the beach while others go to church. No matter what your plans are for the 25th, here are three ways to pay your respects to our fallen heroes.

Fly the Flag

Raising up Old Glory is a great way to show your respect for our lost soldiers – provided that your flag is maintained properly. As with all aspects of the American flag, there are rules for cleaning, storage, and presentation. If your flag is especially old or valuable (a family heirloom, for example), you may want to consider taking it to a cleaner for the best possible care.

Wear Flowers, Or Leave Some

The association of red poppies with Memorial Day comes from a 100-year-old poem, “In Flanders Fields.” There are two popular rituals involving flowers for the holiday. Some people wear a poppy, while others leave some on the grave of a loved one who served in the military. If you were not close to any deceased soldiers, you can still pay your respects at a military cemetery. Either way, it’s a good idea to get in touch with a florist.

Host a Community Gathering

One way to show your gratitude is to spend the day appreciating the communities that our soldiers gave their lives defending. Now that summer weather has arrived, a neighborhood cookout or block party is a promising idea. If you plan to observe Memorial Day this way, you may want to contact caterers, tenters, or other event-planning professionals for help.

As you can see, there are a multitude of ways to thank our servicemen and women who didn’t make it home. Many of these traditions are made easier with a call to a local service professional. To get in touch with cleaners, florists, and event planners near you for this memorial day, try TalkLocal.

5 Convenient Staycation Tips for This Summer

Wednesday, May 13th, 2015

shutterstock_199824269

Your area may not have a nice stock photo beach like this one, but there’s still plenty of fun to be had near you. The “staycation” is taking America by storm as people save time and money by planning their dream trip for this summer… without the trip. Below are five staycation tips that’ll help you enjoy a getaway to your own backyard.

Plan With Your Family

To get your family (especially children) invested in the idea of a staycation, it’s convenient to bring them in to the planning process. Since you have some familiarity with your own area, it’s easy to fill a staycation itinerary with a variety of activities in order to engage everyone.

Take Cues from the Tourists

Just as hundreds of thousands of New Yorkers never visit the Statue of Liberty, there is probably a world-famous (or at least nationally-famous) attraction in your area that you’ve never seen. A staycation provides an opportunity to be a tourist in your own town– grab your favorite Hawaiian shirt and guidebook, then go mimic the photo-junkies from elsewhere.

Treat Yourself

You are already making a very financially responsible decision by foregoing travel for vacation. It’s important to give yourself a pat on the back for your frugality, and to not let it get obsessive. Staycations provide a perfect excuse to splurge on a five-star restaurant, a spa day, a pool/athletic club membership, etc. You don’t have to be in a resort town to pamper yourself.

Use Local Search Apps

Sticking around in the summer gives you the opportunity to explore your area more. With the advent of local search technology, finding previously-unknown restaurants, attractions, and businesses near you is as easy as opening an app. The most useful of these apps include Yelp, Google Maps, and (shameless plug) TalkLocal.

Get Vacation-Quality Service

Some hardcore staycationers go so far as to rent a local hotel room for the full experience. If that’s a little excessive for you, you can also purchase the kind of personal services hotels offer for your home. While you’re on your staycation, hire a cleaning service. Get nice meals delivered. Take taxis or Ubers. This way you can enjoy hotel-quality treatment without the steep hotel markup.

The ideal staycation involves a pretty simple goal: it’s about creating luxury out of what is familiar to you. Often, staycationers find an additional benefit to kicking back this way: without all the unknowns of a new place, planning a staycation is easy. If you want to make it even easier, use TalkLocal to get connected to cleaners, taxis, massage therapists, and other service professionals who can help you create your dream getaway in your own town.


Mother’s Day Flowers: Choosing the Perfect Match For Mom

Wednesday, May 6th, 2015

By: Shaquille Telford

Flowers as a Mother’s Day present are a time honored tradition not just because flowers are beautiful, but because they are meaningful. They’re a lot like mom herself in that way: she means the world to you. So, instead of buying the first bouquet you find at your local florist, it’s probably best to do some research to ensure that your choice reflects what your mom means to you. Lucky for you, we’ve done the research for you. We decided to call up a few florists, and do some of our own research to compile a list of flowers that would always be great for Mother’s day.

We have compiled a list of flowers to help you choose the best bouquet for your mother. Keep in mind, there is usually some type of meaning behind each flower, so it’s best to match your mother’s traits with the traits of different flowers.

Without further ado, here are the most popular mother’s day flowers and the meaning behind each:

1.       Roses (specifically red roses)

Signifies deep emotions like love. According to one florist I talked to, red roses are the most popular flowers in bouquets for Mother’s Day (and probably every time of year). Literally every company I called had a bunch of roses in their most popular bouquets.

2.       Tulips (multi-colored)

Symbolizes a declaration of love. Most of the florists recommended tulips, but specifically tulips in a variety of colors.

3.       Lilies

Symbolizes purity and refined beauty.

4.       Carnations

Symbolizes pride and beauty.

5.       Daisies

Symbolizes innocence, purity, and loyal love.

6.       Sunflowers

Symbolizes pure thoughts, adoration, and dedication.

7.       Asters

Symbolizes patience, love, elegance, and daintiness.

8.       Irises

Symbolizes eloquence.

After all this, if you still don’t know which flowers to choose, just get some roses. They never fail! And, be sure to visit TalkLocal to get in touch with your local florist, and get your mom that perfect flower for Mother’s Day.

Enjoy!

How to Fix a Kicked In Door

Wednesday, May 6th, 2015

shutterstock_335149436

If you’re reading this, your door is kicked in, so either you or one of your friends has some serious anger management issues. We’ll teach you how to fix a kicked in door just this once, but as a preventative measure I’d probably head to your nearest therapist’s office…

1.     Break in the seam between the door jam and the trim

2.     Remove the strike plate

3.     Pull out the piece from the wall

4.     Remove excess wood and sand over the area

5.     Apply wood epoxy into the cracks

6.     Hold together the area using screws in the door jam

7.     Wipe off extra epoxy and after the area is dry, sand it down again

8.     Screw your new strike plate into place

9.     Nail the trim back into place

10.   Test the door!

Or if you’re not in the mood to fix your kicked in door by yourself, let TalkLocal call a professional and have this fixed for you!