Posts Tagged ‘home improvement’


Top 3 Simple Yet Practically Genius Home Improvement Options

Wednesday, September 30th, 2015

Untitled design-1

There are renovations that you just want to accessorize the home and ones that are absolute necessities. Then, there are these genius home improvement options that we deem neaccessities: accessories so neat they constitute necessities.

The word may be made up but the concept is clearly an ontological fact. Language, the written word, the wheel and indoor plumbing are all inventions which – although not crucial to survival – so greatly enhanced human quality of life and culture that a world in their absence feels literally inhuman. And that’s what these renovations do for the home. They make homes without these features appear unsuitable for mankind.

Here are 3 home renovations that from the moment I experienced them, left me feeling like a caveman…who had just discovered fire!

Indoor Doggy/Kitty Doors:

Seeing the litter box of Malicious Mittens and The Great Catsby is a great reminder to clean said litter box daily. But, as the look of mutual embarrassment passes over all our mammalian faces, I’m reminded that I’d rather set a daily calendar alert. So, why not install a pet door into that perfectly good broom closet where gentle felines could do their business in quiet dignity?

Plus, if you don’t mind pets in your room, then there’s no reason they should be barred from/imprisoned inside anywhere to conserve heating or cooling from a space heater or A/C. Pet doors as needed throughout the home ensure seamless co-existence with your pets…without you all living like animals!

Closet Remodeling:

The next time someone gives you a tour of their beautiful home, repeat after me (Jerry Maguire style): “Show…me…the…closets!” There are options like rolling ladders, upper-storage cabinets, pull-out and slide-out shelves, cubby-holes and more. There’s a personalized design for every wardrobe and lifestyle. If you want to spend as little time in your closet as possible, cut the frills and maximize efficiency. And, if you love playing dress-up like me, the right design can make daily primping feel like a mini shopping spree at a high-end boutique.

What you won’t do is rummage through a veritable trough like a pig bobbing for apples for the rest of your life. I’ll pause while you reevaluate your life choices thus far.

Heating Vent Beneath the Kitchen Sink:

As a guest in someone’s home, you may be gracious enough to clear the table. Then, a radiant wind like angels’ breath brushes across your peep-toe kitten heels. Discreetly stepping out of your shoe…gasp! Is this a memory foam kitchen floor mat? Why yes, it is. Then, you proceed to wash a dish and dry a dish, and wash a cup and a pan – all while cooing at the sunshine nipping at your toes.

That is the power of strategically placed heating vents, not-to-mention memory foam kitchen floor mats. You’ll clear the sink far more willingly with your toes swaddled in a cloud of summer breezes. And, if you’re not standing in the warm white sands of sun-kissed memory foam every time you do your chores, then you might as well be walking on coals while dingoes chew at your ankles!

I’m sorry if the cornea-searing light of smart home renovation has blinded you to the few minuscule pleasures of your once unwittingly bleak existence. You’re not alone. I, too, wallowed in newly recognized squalor but am now planning my own home improvement renaissance; with each step, I am closer to renovation nirvana. Change is gonna come, my friends.

And, if you’re in the process of choosing a handyman to bring the changes you and your home so desperately need, TalkLocal can help. Just visit TalkLocal to go from search to conversing with the right local professional over the phone in about 90 seconds.

Fixing Warped Hardwood Floors is Easier than It Looks

Friday, August 14th, 2015

Warped hardwood floors are troubling. Nobody wants to see their beautiful wood floor bulging at the center (crowning) or lifting at the edges (cupping) – but luckily, these issues can be solved without ripping up the whole floor. Warping happens when wood absorbs an uneven amount of moisture; the more saturated areas will expand and protrude. This is why the first of the four techniques we’ll show you for fixing warped hardwood floors involves warping them back into place!

Counter-Warping (For Minor Warps):

This technique can only be used if the warp is minor and the wood still somewhat pliable. All you need to do is wet down the warped area and place a cinder block or two over it for 24 hours. The weight of the cinder blocks (which you can get at your local Lowe’s or Home Depot) should force the wood to press back into uniformity with the rest of the floor.

Sanding Down (For Minor to Intermediate Warps):

It’s a little more labor-intensive, but more severe warps can be handled by fitting a drum sander with 20-grit paper and vigorously sanding in a diagonal motion. You’d be surprised how much of the thickness of the wood can be removed with this technique. Because you’ll need to apply a new finish afterwards, try to use progressively finer sandpaper as you grind the wood down further.

Replacement (For Severe Warps):

You should only rip up and replace the wood after exhausting all other options. Start by finding a suitable replacement, and then get up the old floor. This procedure will vary depending on what type of wood your floor is made of and how it’s been fixed to the floorboards. Fix the new wood in its place, and then treat it so it looks uniform, using paint, stain, or finish.

TalkLocal (For Extreme Warps):

The nastiest of warps are best handled by a professional. Let us take care of that for you. Head over to TalkLocal, where we’ll give you free, full access to our unique search system; with our help, the experience of finding a handyman will be smoother than your beautiful new floor.

How To Repair Concrete Steps and Curbs: Fixing A Crack Won’t Break Anyone’s Back

Friday, July 31st, 2015

Whether or not you’re the type of person who’s bothered by slight blemishes like a crack in concrete, those little fractures need your attention – ice, dirt, and roots can deepen the crack until it becomes both hazardous and unsightly. Fortunately, learning how to repair concrete steps and curbs isn’t always backbreaking.

Here are some tips for DIY repair of three common problems: crack large and small, chipped stairs, and damaged curbs.

The required materials, standard fare at any local hardware store, include:

How to Repair Cracks in Concrete

Small cracks don’t require concrete to repair; instead, you can just grab masonry crack filler, which can be used with a caulking gun. Brush the area clear of dust and debris and wash it down with a hose. After it’s dry, just apply the filler and trowel off any excess.

Bigger cracks require a hammer and chisel. These are used to undercut the edges of the crack, which will allow the vinyl patching compound or mortar to set in more securely. After undercutting, sweep away debris and wash the crack down. Mix the patching compound per manufacturer instructions and tamp it in with the trowel, then smooth it down. As it sets, scrub with wire brush until it matches the surrounding area..

How to Repair Chipped Concrete Steps

If your steps are significantly damaged or chipped on a corner, the procedure is the same as repairing a crack, but it will require mixed concrete, a trowel, and straight planks to use as a form. Just place the planks flush the planks against the steps, clean up the steps with the brush and hose, and apply the concrete and bonding agent.

How to Repair a Concrete Curb

If the curb is too damaged, you’re going to need a jackhammer to clear up the broken pieces. After breaking up the blemished areas, sweep away debris and apply the concrete as previously instructed.

More extensive damages may require replacement of the whole curb – in this case, contact a contractor or your local government.

Want to hire a handyman restore your concrete curbs and steps to their maximum appeal? TalkLocal matches and connects you by phone to a top ranked handyman who knows your problem and wants to help on your schedule. And it’s free! Just describe the task you need done, when, and where. Then stand by until you hear from a handyman near you. Visit TalkLocal to get started.

How To Fix a Kicked In Door (we don’t need to know why)

Wednesday, July 29th, 2015

Someone in your household has decided that life is too short to be stopped by a hinged block of wood and, as a result, has delivered terrible wrath upon your door. Whether you’re a frat boy doing damage control before your chapter’s president does his rounds or an irritated homeowner seeking to save money, you might be able to fix a kicked in door yourself – it just requires a bit of time and a few materials from your local hardware store. (If you’re the victim of a break-in, be sure to call the police before attempting to fix your door, as it might become evidence in a criminal investigation.)

Here are a few steps to restore your door to its former glory:

1) Obtain all the necessary materials. You will need a putty knife, diagonal pliers, a screwdriver, wood glue, clamps, chisel, 11/4-inch finish nails, a hammer, a set of nails, a putty crayon, and a stain marker. In some cases, you may also need replacement casing, and a miter saw…and it’s not a bad idea to get thick gloves for safety.

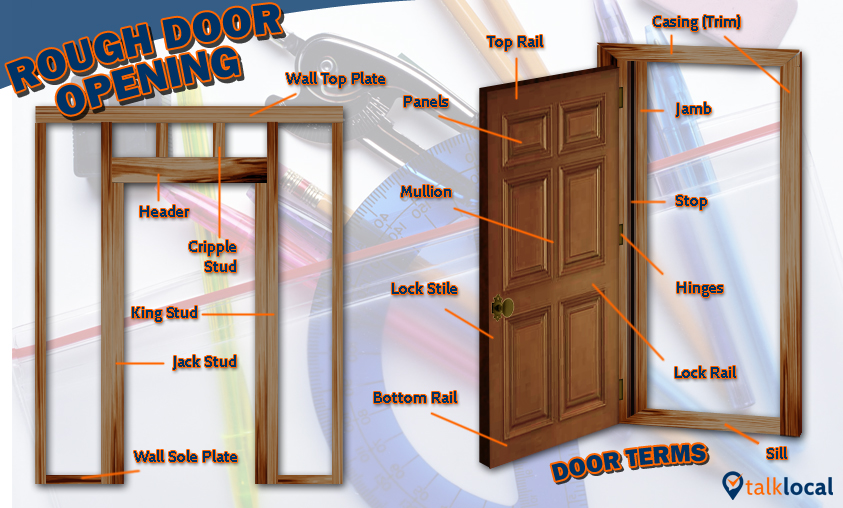
2) Determine specifically how your door has been damaged. Typically, a door is broken in by a kick landing just above the knob, which causes a split in the jamb (the part of the frame across the stop from the hinges) running up to the casing (the top part of the frame). Remove the casing with the putty knife and use the pliers to remove any remaining nails.

Door Diagram

3) Carefully remove any parts of the wood that are chipped off using the putty knife. If the casing is damaged, it must be replaced.

4) Look at the strike plate, the long piece of metal nailed into the frame around the lock. If the crack runs behind it or the strike plate is damaged, remove it using the screwdriver.

Strike Plate.png

(Credit)

5) If the jamb has been displaced, push it back to its original position and clean out any debris using the putty knife. If the jamb cannot be pushed together tightly, it must be replaced. Put the glue on the putty knife and spread it on the inside of the crack, and then push the sides of the jamb together with clamps until they fit together tightly. Let the glue dry for an hour, and then remove the clamps.

6) Screw back on the striker plate, if necessary.

7) Nail the casing back onto the frame with the nail set and hammer. Putty any holes with a putty crayon of matching color, and use the stain marker to color over where the jamb was split, after removing excess glue.

Of course, if you’re short on time or the damage is too extensive, head over to TalkLocal – we’ll help you find the perfect contractor without the research-schedule-wait headache.

DIY Faux Brick Wall Installation: Swanky Indoor Styles

Friday, July 3rd, 2015

shutterstock_322214192

Brick is everywhere these days – restaurants, swanky bars, modern homes – and for good reason: nothing adds a rustic touch like indoor brick walls. DIY faux brick wall installation isn’t that hard and it’s much cheaper; also, like laminate flooring, it looks convincing. Follow these easy steps to spice up your home.

1)      Measure your wall and decide how many bricks you need, as well as if you’re going to need to create special templates for windows and light fixtures, which can easily be done with cardboard and a box cutter or scissors. Faux brick wall tiles can be bought at almost any DIY store, or ordered from Home Depot online.

2)      Decide on a color scheme. You may be able to choose any, but in some cases, important furniture will require that you use certain colors. Though you can buy faux brick in almost any color, they can be painted to whichever you like.

3)     Saw the panels to conform to your templates.

4)      Get a hammer, nails, safety gloves, a nail gun, and caulking equipment. The panels can be easily affixed to the wall, no catch – just make sure you’re not obstructing objects on your walls by properly cutting down the panels.

5)      Make sure to caulk the panels down to fill in any cracks or spaces.

Small DIY home improvement projects like these can be fun and easy – but if you have a bigger project on your hands and lack the time or space to do it, get a professional. Head over to TalkLocal and we’ll fix you up with the perfect contractor for all your home improvement needs.

Summer How-To: How to Brighten Up a Room

Wednesday, June 4th, 2014

Many of us are not able to leave the house and vacation in the tropical islands of the Maldives over the summer, but that doesn’t mean our home has to feel like a dark box trapping us May through August. With help from a few tools, or even a handyman if you are unable to find the time to do so yourself, here’s how to brighten up a room for the summer:

Walls: Go for light colors, such as white or an off-white shade. If you don’t feel like painting all the walls white, you can definitely opt to paint one wall as an “accent wall”. If the room has big windows, this can help reflect the natural light when it enters the room, brightening the entire room.

Decor: To contrast the white walls, go for a pop of color with your decor. Colorful vases, coasters, or trinkets set around the room can make the room feel brighter and even happier.  You can decide to take the neon route (neon greens, blues, pinks) or traditional bright colors (teal, cyan, magenta, etc). For your windows, keep it simple with white blinds and if you want curtains, minimize and emphasize the natural light.

Furniture: The style of furniture in your newly brightened room is pretty flexible. Some may want a more beachy feel, going for wicker style chairs and wood colors with white accents. Some may want to continue with the color scheme of the decor and choose colored sofas and pillows. (Tip: To not only brighten your room but make it seem larger, aim for furniture with a minimalist silhouette and/or low sitting profiles.)

Remember that you are not alone in this process, TalkLocal is here to help you find a handyman, painter, or window replacement company at a moment’s notice!

Refinish Wooden Deck

Thursday, January 9th, 2014

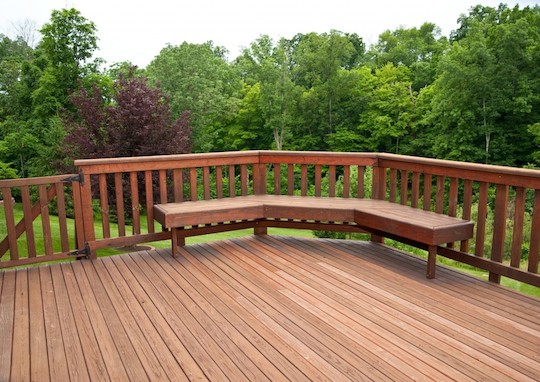
Refinish Wooden Deck - Painters

The wooden deck behind your home is a place where many memories are made. Be sure to protect and extend the life of the wood by refinishing the deck. Doing this will make your deck look fantastic as well as improve your home’s resale value.

Here are a few basic steps to help you refinish wooden decks.

Inspect the State of Your Deck

To start the refinishing process, begin by inspecting the wood deck for any structural problems. A wood deck endures many environmental challenges. There may be loose boards, as well as rotting or severely split wood. It’s best to fix those issues before beginning the actual process of restoring the deck.

Power Wash the Deck

The critical component of deep cleaning a wooden deck is to power wash it.  To do this, use a power washer with a water pressure that is as low as possible while still being effective. Cedar, pine, and other softwoods should have a water pressure around 500-600 psi. Increase water pressure for harder woods, but do not go higher then 1200-1500 psi.

Sand the Wood

After the power washing is complete, it is time to move on to sanding the wooden deck. The reason behind this is due to wood fibers that could have risen during power washing. These fibers do not go down and could cause splinters, so sanding the wood gives it a smooth, even finish.

Apply the Wood Stain

Once you have completed the preceding steps, it is time to get your tools and begin staining the deck!

Start with the handrails, and work your way down to the deck boards. Use a smaller brush for areas such as handrails and trim boards. Flat paint pad applicators can help cover large areas while providing a nice even coverage of the stain

Seek Professional Help

There are many stages of this process that you may not know how to do or possess the necessary tools to complete. For help, use Seva Call. We will connect you with professionals who can fit into your schedule. Contact Seva Call now, so you can begin preparing your deck for a wonderful spring!

Zombie-Proof Your Home: New Duds – Zombie Armor

Wednesday, August 7th, 2013

Zombie-Proof Your Home: New Duds - Zombie Armor - Seva Team

Written by Steven D’Adamo

Steve here with another update from Fort Talk Local. Manpreet has encouraged me to keep writing these blogs until we can connect with real people again, and hopefully find Seva Man, who is still somewhere in the Midwest.

Since reuniting with our leader and fortifying our home, we have become emboldened. We conduct frequent raids to CostCo, gathering up as much supplies as we can, and search through surrounding neighborhoods for other survivors. We’re ecstatic to report that there are more than we thought!

We also send out parties to find zombies. And boy have we learned a few lessons…

– Cotton t-shirts are not made for protection of any kind.

– Bare skin is an open invitation to bites and scratches.

– Real armor is hard to find.

And that’s why we’ve each begun designing our own, custom armor. I advise that you do the same, and I have some ideas to get you started. Now that you know how to zombie-proof your home, it’s time to venture out and help others. Here are some easy, DIY armor ideas.

1. Headgear. Helmets, goggles, sunglasses, those weird earmuffs that wrap around the back of your head, even a hockey mask. Protect your face and head from scratches. Ears, eyes, and long hair are particularly vulnerable to pulling and gouging.

2. Thick materials. Your plain cotton t’s won’t cut it anymore. Rummage through your parents’ closet for an 80’s-style leather vest, or find thicker jackets to use as upper body reinforcement. Scrap denim is great for reinforcing joints and limbs in long-sleeved shirts, or doubling up on leg protection.

3. Real shoes. You can wear sandals or crocs (vomit) the next time you feel safe wandering around outside mostly naked. Ditch the open-toed footwear for something that will actually protect your feet. Above-the-ankle, steel-tipped, waterproof boots are ideal.

4. Get creative. Use plastic or metal scraps as a form of padding on your clothes. Seriously. Just go Office Space on a computer monitor and tie the strips of plastic around your forearms for some homemade wrist-guards. Nothing says “Don’t bite me!” like a swinging, plastic-reinforced forearm to the teeth.

5. Duct tape. Yes, old reliable even has its uses during the zombie apocalypse. Don’t have any fancy clothes or makeshift armor? Duct-tape your arms and legs, or any bare skin you don’t mind taping up. While the zombies are busy chewing on your cheap armor, you’ll be busy bashing their heads in. Just don’t cut off circulation.

6. Combine 4 and 5. Go big by duct taping plastic or metal scraps to a long-sleeved shirt, and then taping up any open fabric. The tape will prevent fabric from ripping, and the added armor is just that.

It’s just so hard to find a reliable tailor in the post-apocalyptic wasteland. However, you should be able to find something to protect yourself with as you forage for food, survivors, or vintage Pokemon cards… whatever floats your boat.

Stay safe, and get to fighting. Steve out.