Flag Day, June 16th, is quickly approaching – don’t neglect it. This holiday calls upon us to showcase our patriotism through displays of the American flag and its colors; a great way to do this, of course, is through hanging high the old Star Spangled Banner. If you’re interested in getting a residential flag pole so you can honor the Flag on its holiday, or whatever flags you care about any time of the year, make sure you’re doing it right with this easy guide on how to install a flag pole.
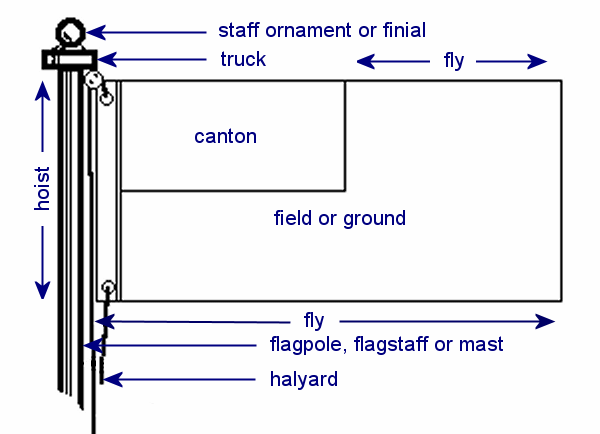
1) First, familiarize yourself with the anatomy of a flagpole; these terms will be useful in the following steps. Here’s a helpful graphic from www.netstate.com:

A flag is composed of the following parts:
The hoist is the height of the flag when hung.
The field refers to the area of the flag, not including the upper-left quarter, which is called the canton.
The fly is the length of the flag – the space between where it joins the flagpole and the fly end, the far side of the flag.
A flagpole is composed of the following parts:
The flagpole is the tall metal cylinder that supports the flag.
The truck tops the flagpole, with holes from which pulleys are attached.
A halyard is the rope, threaded through the pulley on the truck, that raises and lowers the flag.
The finial is an ornament that rests atop the truck.
Another important part of the flagpole is the foundation, which supports the pole from deep in the ground. Here’s a diagram of the foundation from www.flagdesk.com:
This foundation dimension calculator will help determine the size of the foundation hole you need to dig.
2) 24 hours before installing the flagpole, dig your foundation hole to the dimensions called for by the calculator. Set the foundation sleeve into the center of the hole, using a level on top to ensure it is flat. Let the ground sleeve stick out of the ground by two inches. Add concrete around foundation sleeve to fill in the hole and mix in water intermittently to ensure uniform thickness. A concrete to water ratio of 4:1 is typically recommended.
3) Some concrete will come with a collar, used to elevate certain areas of concrete. Place the collar in the wet concrete around the protruding foundation sleeve and fill the area between the two with concrete. This will be used to hold the shock collar, which will protect the foundation from water.
4) Wait 24 hours for the concrete to dry.
5) The next day, take the flagpole and rest it on two padded sawhorses. Measure to the center of the pole and drill holes for the cleat. The size and distance of these holes will be determined by the cleat you use.
6) Most trucks can simply be screwed into the top of the flagpole, but if it doesn’t fit tightly enough, you can caulk it over before screwing it on. The truck should have a hole on top into which the finial is inserted.
7) Cleat off the end of the halyard.
8) Raise the flagpole into the foundation. It can be easier to tape the shock collar to the flagpole before doing this so it doesn’t obstruct raising the flag. This task is most safely done with three people.
9) Caulk the shock collar to the concrete. Top the concrete with gravel to improve appearance.
This is a pretty heavy DIY project and takes a few days to complete. If you don’t have the time or aren’t feeling up to it, don’t let your Flag Day display suffer – head over to www.talklocal.com and we’ll find you the perfect handyman, free of charge and without the headache.


